Freelancing & Online Business
How to Set Up a WordPress Blog Step by Step (2026 Beginner's Guide)
Learn how to set up a WordPress blog step by step with this beginner's guide for 2026. Covers domain, hosting, plugins, SEO setup, and your first post.
By Bibek Thapa · Published May 13, 2026 · Updated Jul 14, 2026 · 19 min read
Quick Answer
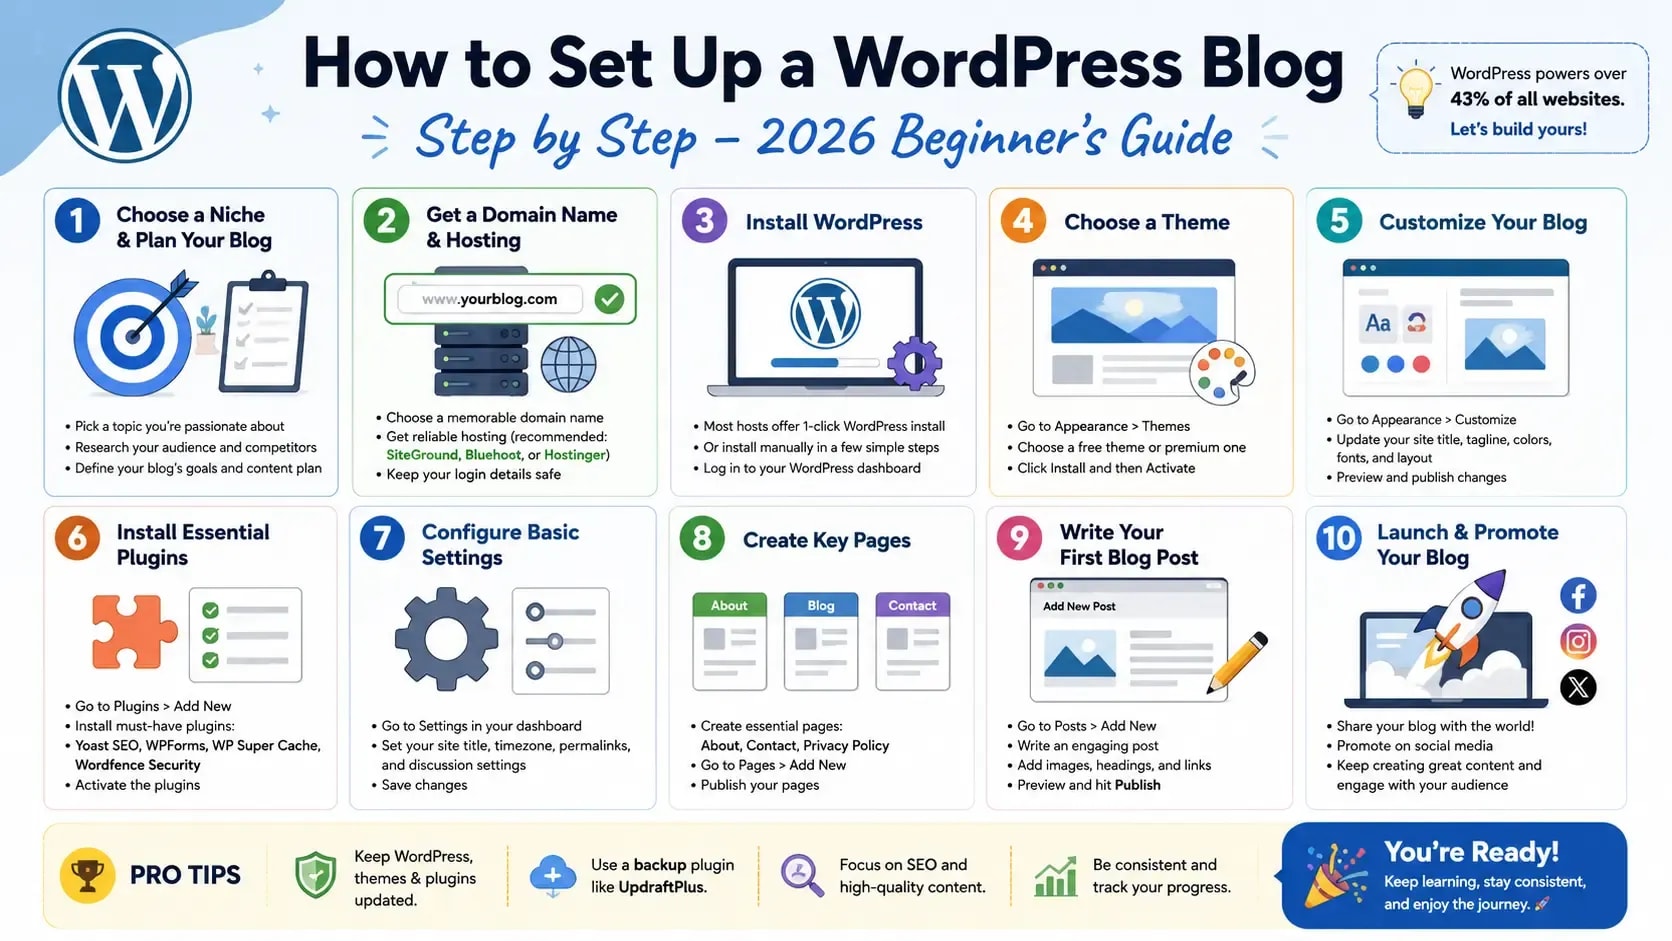
Quick Answer: To learn how to set up a WordPress blog step by step, start by buying a domain name and web hosting, install WordPress through your host's one-click installer, pick a theme, add a handful of essential plugins, configure your SEO settings, and publish your first post. The whole thing takes 1 to 2 hours and costs as little as $35 to $60 per year.
Table of Contents
- How to Set Up a WordPress Blog Step by Step: What You Need First
- WordPress.org vs WordPress.com: Get This Right Before You Do Anything Else
- What Does a WordPress Blog Actually Cost?
- Before You Start: Get These Ready in 5 Minutes
- Step 1: Choose and Register Your Domain Name
- What Actually Makes a Good Domain Name
- Where to Register
- Step 2: Choose and Set Up Web Hosting
- Best Hosting for New WordPress Blogs in 2026
- Setting Up Your Hosting Account
- Shared vs Managed WordPress Hosting
- Step 3: Install WordPress
- Via cPanel (most common)
- Via Hostinger (hPanel)
- Via SiteGround (Site Tools)
- What to Actually Enter During Installation
- Logging Into Your WordPress Dashboard
- Step 4: Choose and Install a WordPress Theme
- What to Look For in a Theme
- Best Free Themes for New Bloggers
- How to Install Your Theme
- Step 5: Install the Right Plugins
- The 7 Plugins Every New WordPress Blog Needs
- How to Install a Plugin
- Plugins to Skip When You're Starting Out
- Step 6: Configure Your SEO Settings Before You Publish Anything
- First: Set Your Permalink Structure
- Second: Set Up RankMath SEO
- Third: Connect Google Search Console
- Step 7: Write and Publish Your First Blog Post
- Creating a Post in WordPress
- A Simple Structure That Works for Blog Posts
- Before You Hit Publish
- WordPress Security: Don't Skip This Section
- Five Things to Do Right After Installing WordPress
- Getting SSL (HTTPS) on Your Blog
- Post-Launch Checklist
- Technical
- SEO
- Content
- Common Setup Mistakes (and How to Fix Them)
- What to Do After Your Blog Is Live
Quick Answer: To learn how to set up a WordPress blog step by step, start by buying a domain name and web hosting, install WordPress through your host's one-click installer, pick a theme, add a handful of essential plugins, configure your SEO settings, and publish your first post. The whole thing takes 1 to 2 hours and costs as little as $35 to $60 per year.
Most WordPress setup guides walk you through clicking buttons and nothing else. You finish reading and still don't know why you chose that permalink setting, what hosting actually does, or why skipping the SEO setup on day one comes back to bite you three months later.
In this guide, you will go from a blank screen to a fully configured, SEO-ready blog in a single afternoon, no coding required. Whether you're starting a personal blog, a niche site, or something you plan to monetize, you'll end up with a properly configured WordPress blog - not just an installed one.
How to Set Up a WordPress Blog Step by Step: What You Need First
WordPress is a free content management system (CMS) that runs on a web server and lets you build and manage a blog without writing code. It started in 2003 as a simple blogging tool. Today it runs over 43% of all websites on the internet - everything from solo hobby blogs to major news publishers.
The reason beginners keep gravitating toward it isn't just that it's popular. It's that the ecosystem around it is enormous. Stuck on something? There are thousands of tutorials, a massive support forum, and plugins for almost every feature you could imagine. You don't need to know PHP, MySQL, or CSS. If you can type in a word processor, you can run a WordPress blog.
WordPress.org vs WordPress.com: Get This Right Before You Do Anything Else
This is the one thing that confuses almost every beginner, and getting it wrong wastes real time.
WordPress.org is free software you download and install on your own web hosting. You own the site, can install any plugin or theme, and can monetize however you want. This is what most people mean when they say "WordPress."

WordPress.com is a hosted service. They handle the server for you. The free plan gives you a blog at yourname.wordpress.com, but you can't install plugins, you can't run ads, and your "domain" has WordPress branding in it. To get the features most bloggers actually need, you'd have to pay for a higher plan - at which point you might as well have just paid for your own hosting.
If you ever want to make money from your blog, self-hosted WordPress.org is the only path that makes sense from the start.
What Does a WordPress Blog Actually Cost?
WordPress software is free. What you're paying for is a domain name and web hosting - the address and the server space.
Most guides skip past the real numbers because they're pushing affiliate links to specific hosts. Here's an honest breakdown:
A few costs people get surprised by later:
Domain privacy costs $5 to $15 per year and hides your personal contact info from public WHOIS lookups. Some registrars include it free (Namecheap does). Check your cart at checkout - some hosts add it automatically without asking.
Email hosting is separate from web hosting. The email address your host gives you for free is often unreliable. Google Workspace costs $6/month for a professional email at your own domain.
You don't need to spend more than $60 to launch a real blog. Just know the number will grow once you start adding things you actually want.
Before You Start: Get These Ready in 5 Minutes
- A blog topic decided (broad is fine at this stage)
- 3 to 5 domain name ideas (your first choice is probably taken)
- A credit card or PayPal for hosting payment
- An email address for your hosting account
- A free afternoon - setup takes 1 to 4 hours depending on how much you configure
- Somewhere to save passwords (a notes app, password manager, or notebook)
Step 1: Choose and Register Your Domain Name
Your domain name is your blog's web address. For Anobee, that's bibekthapa00.com.np. For a new blog, you pick something new.
This is also the one decision that's genuinely hard to undo. Your domain becomes your brand, your professional email address, and the thing you tell people at conferences. Spend real time on it. If you are still deciding on a niche, read our guide on keyword research for Nepali blogs first.
What Actually Makes a Good Domain Name
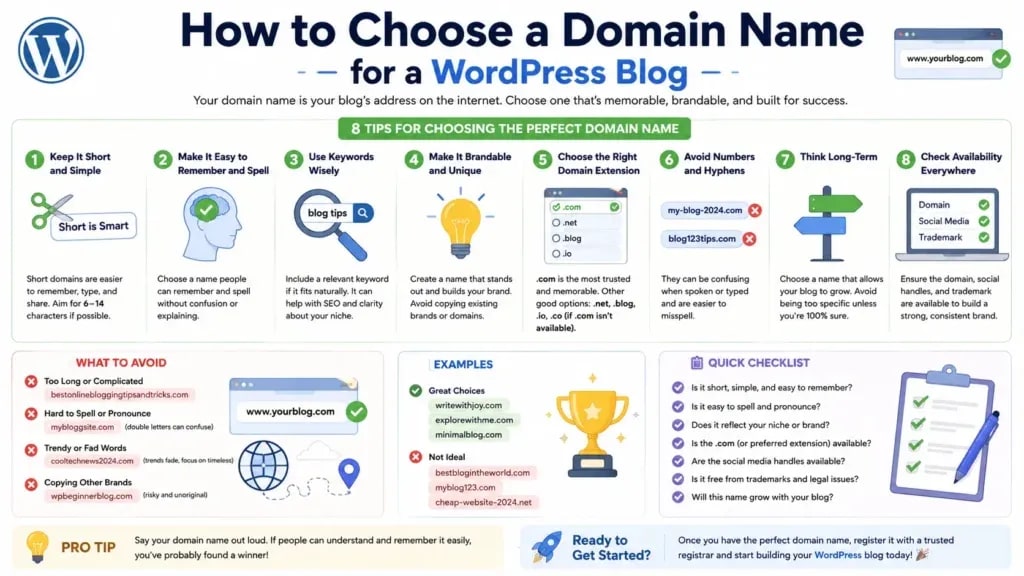
Short beats clever. Under 15 characters if possible. Long domains get mistyped, misremembered, and look messy in print.
Spell it out loud. If you have to add "that's two words, no hyphen, with a Z" every time you say your domain, it's the wrong name.
Skip the hyphens. best-tech-blog-2026.com looks like spam in search results and is awkward to say. It also ages badly.
Brand over keyword. Exact-match keyword domains don't carry the ranking advantage they once did. TechWithMaya.com is a better long-term bet than techblog2026.com - more memorable, doesn't become outdated, and actually sounds like a person made it.
Go .com first. It still carries the most recognition globally. For Nepal-targeted content, .com.np is a credible local option worth considering.
Where to Register
If your host offers a free domain for the first year, take it. Otherwise, Namecheap or Cloudflare Registrar are the cheapest options over time.
Mistakes to avoid: domains with trademarked words (legal risk), domains where the .com version of your name belongs to a competitor, and using your full legal name if you plan to eventually sell the site.
Step 2: Choose and Set Up Web Hosting
Hosting is a server that stores your WordPress files and delivers them to anyone who visits your blog. When someone types your domain and hits enter, a server somewhere sends them your pages. The quality of that server determines how fast your site loads.
Best Hosting for New WordPress Blogs in 2026
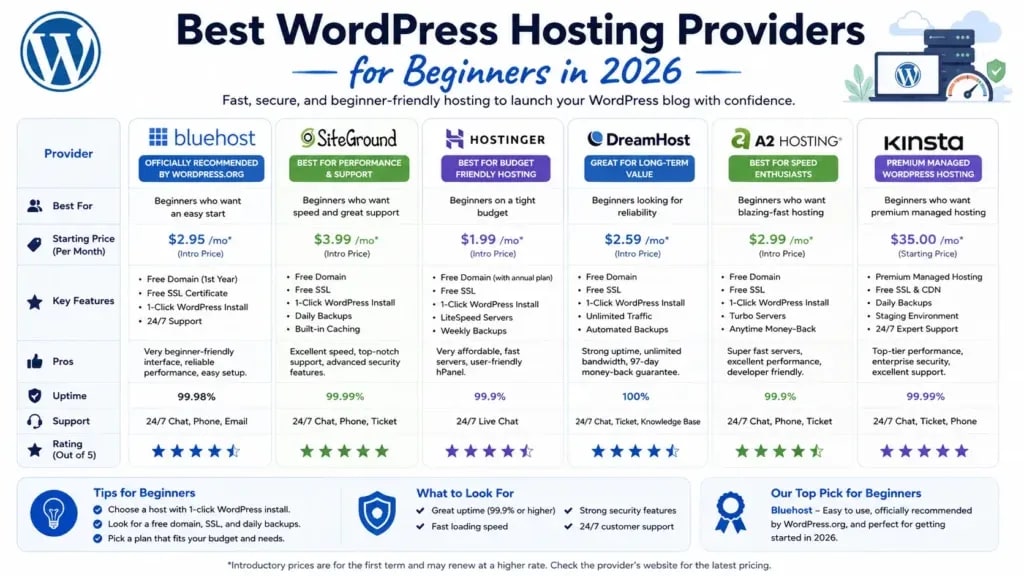
For Nepali readers specifically: Hostinger has servers in Singapore and India. That matters for page load times for South Asian visitors. US-only server hosting is noticeably slower for audiences in this region.
Setting Up Your Hosting Account
- Go to your chosen host's website
- Pick a basic or starter plan - you can upgrade later
- Enter your domain (or register one through them)
- Fill in your account details
- Choose annual billing rather than monthly - hosting companies charge significantly less per month when you pay for a year upfront, often 60 to 75% less
- Complete payment
- Check your email for your login credentials
Shared vs Managed WordPress Hosting
Shared hosting puts your blog on a server with many other sites. It's cheap ($3-$10/month) and more than adequate until you consistently hit 10,000 to 20,000 monthly visitors.
Managed WordPress hosting is a server tuned specifically for WordPress, with automatic updates and backups handled for you. It starts around $20 to $35/month and makes sense when your traffic justifies the cost.
Start with shared hosting. The reason most new blogs fail has nothing to do with hosting - it's publishing inconsistency. Get a reliable shared plan and put your energy into content.
Step 3: Install WordPress
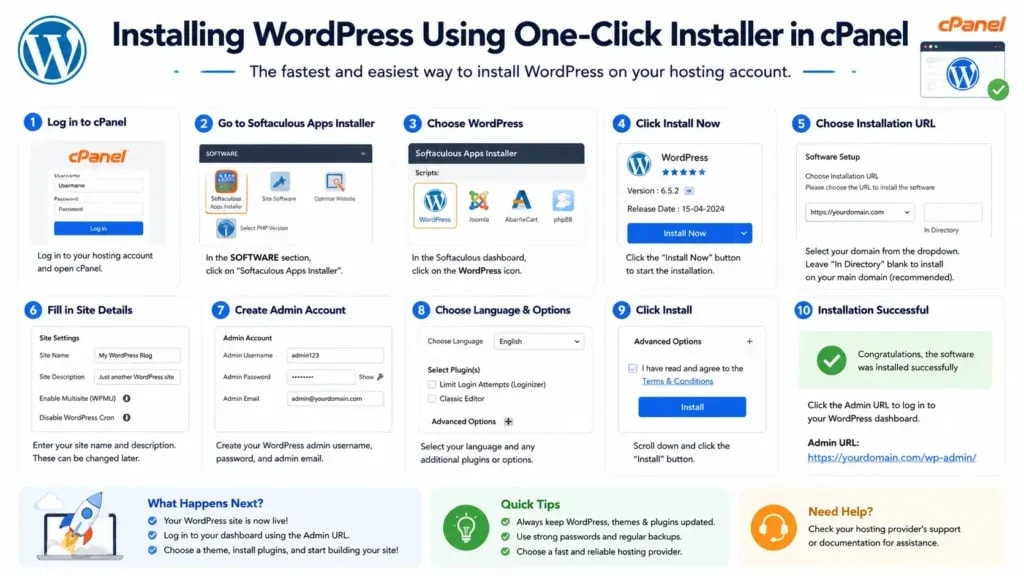
This step looks scarier than it is. Almost every major hosting provider now includes a one-click WordPress installer. The whole thing takes about three minutes. This is one of the easiest parts of how to set up a WordPress blog step by step. Download the software for free at WordPress.org and install it using your host's one-click installer.
Via cPanel (most common)
- Log into your hosting control panel (your host emails you the link)
- Find "WordPress Installer," "Softaculous," or "WordPress Manager"
- Click Install Now
- Fill in your settings (see below)
- Click Install, wait 2 to 3 minutes
Via Hostinger (hPanel)
- Log into hPanel
- Go to Websites, then Add Website
- Select WordPress as your platform
- Follow the guided setup
Via SiteGround (Site Tools)
- Log into Site Tools
- Go to WordPress, then Install and Manage
- Click Install and complete the fields
What to Actually Enter During Installation
The admin username is worth repeating: don't use "admin." It takes five seconds to change and blocks a very common attack vector.
Logging Into Your WordPress Dashboard
Your admin login page is at https://yourdomain.com/wp-admin
Bookmark it. Enter the credentials you just created. You'll see the WordPress Dashboard - the control panel for everything on your blog.
It looks like a lot at first. Ignore most of it for now. You'll learn what each section does as you use it.

Step 4: Choose and Install a WordPress Theme
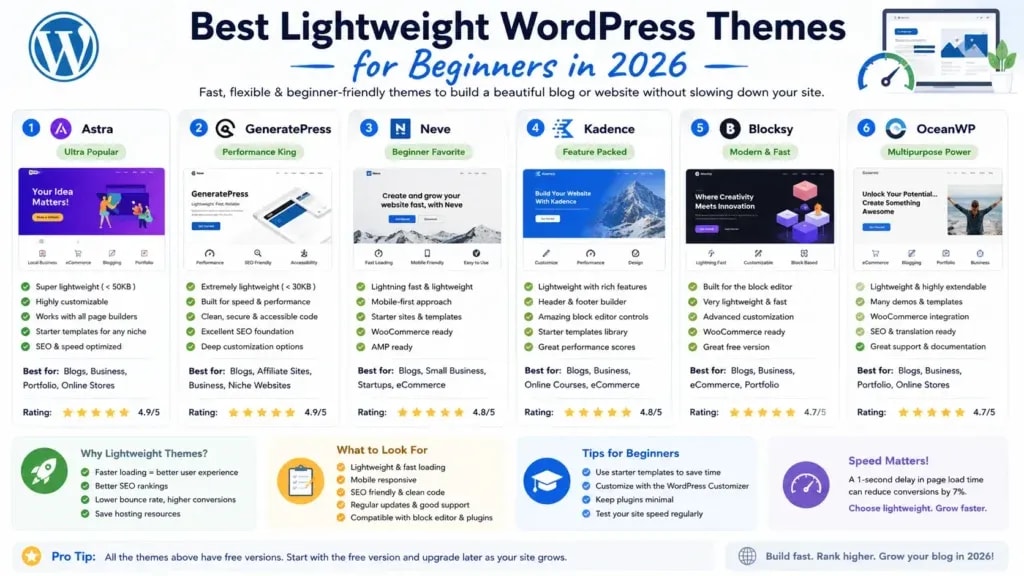
Your theme controls how your blog looks. But it also affects how fast your blog loads, which affects your Google rankings. A visually impressive theme that takes 4 seconds to load is a bad trade.
Pick something lightweight.
What to Look For in a Theme
Fast loading - check the theme's PageSpeed Insights scores if the developer publishes them. Mobile responsive - every theme should be in 2026, but verify anyway. Regular updates - a theme that hasn't been updated in two years is a potential security liability. Block editor compatible - works properly with WordPress's built-in Gutenberg editor. Good reviews - 4.5 stars or higher, with recent reviews that mention current versions.
Best Free Themes for New Bloggers
Astra Free is the most practical starting point. Large community, solid documentation, and it loads fast on standard shared hosting without any configuration. GeneratePress is the choice if load speed is your top priority - it's genuinely one of the lightest themes available.
How to Install Your Theme
- Go to Appearance, then Themes in your dashboard
- Click Add New
- Search for your chosen theme
- Click Install, then Activate
- Go to Appearance, then Customize to set up your colors, fonts, and layout
One thing to do immediately: delete any themes you're not using. Inactive themes sitting on your server are still potential security vulnerabilities. The default WordPress themes (Twenty Twenty-Four, etc.) can go.
Step 5: Install the Right Plugins
Plugins add features to WordPress without requiring any code. They're one of the main reasons WordPress beats other platforms for bloggers - there's a well-maintained free plugin for almost everything a new blog needs.
The trap beginners fall into is installing too many. Twenty-five active plugins create performance drag and make it harder to diagnose problems when something breaks. Seven carefully chosen plugins cover everything a new blog needs at launch.

The 7 Plugins Every New WordPress Blog Needs
Note for Anobee specifically: LiteSpeed Cache works natively with LiteSpeed web servers, which Hostinger uses. If you end up on a host running Apache or Nginx, use W3 Total Cache instead.
How to Install a Plugin
- Go to Plugins, then Add New in your dashboard
- Search for the plugin name
- Click Install Now
- Click Activate
- Find the plugin's settings in your left-hand dashboard menu and configure it
Plugins to Skip When You're Starting Out
Jetpack does a lot, but it's heavy. It bundles dozens of features most bloggers never use and noticeably slows sites down. There are better, lighter options for every individual feature it offers.
Page builders (Elementor, Divi) are excellent tools for certain use cases, but if you're just writing blog posts, they're unnecessary weight. The default Gutenberg block editor handles blog posts well.
Multiple SEO plugins at once. Never run RankMath and Yoast simultaneously - they conflict with each other in ways that silently break things.
Anything not updated in 12+ months. Check the "Last Updated" date in the WordPress plugin repository before installing. Outdated plugins are a common entry point for attacks.
Step 6: Configure Your SEO Settings Before You Publish Anything
This is the step most beginners skip, which they regret later. Before configuring RankMath, check our on-page SEO checklist for beginners. Two settings in particular need to be configured before your first post goes live - because changing them after you've published content creates problems that take real work to fix.
First: Set Your Permalink Structure
Go to Settings, then Permalinks in your WordPress dashboard. Do this before writing a single post.
Your permalink structure determines the URL format for every page on your blog.
Select Post Name. This gives you clean, keyword-rich URLs like yoursite.com/how-to-set-up-wordpress-blog. It's what the SEO industry uses by default.
Switching this setting after you've published 10 or 20 posts creates broken URLs across your entire site. You'd need individual 301 redirects for every page. Set it right now and you never have to think about it again.
Second: Set Up RankMath SEO
RankMath is the best free SEO plugin for WordPress available in 2026.
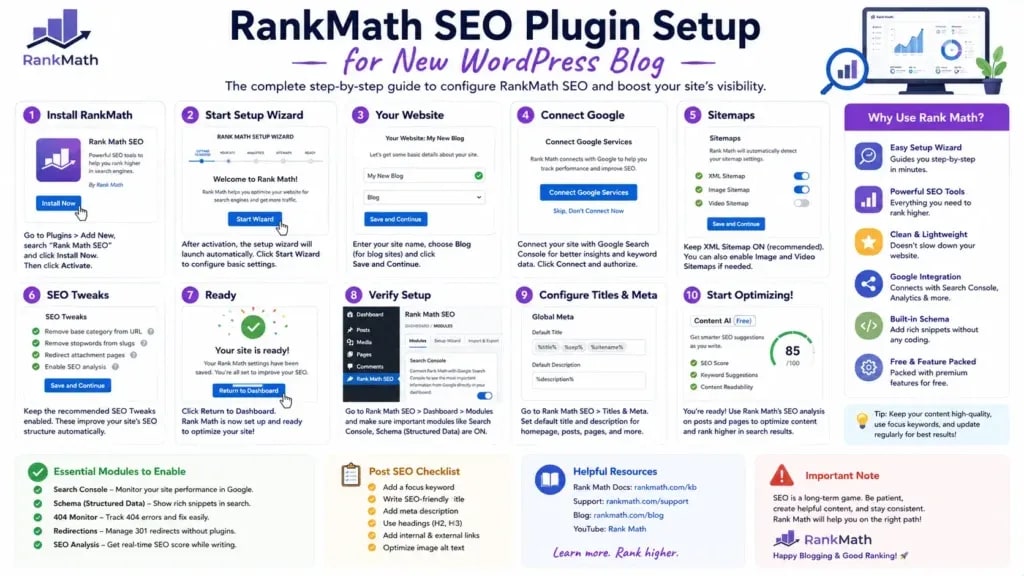
Here's the setup sequence:
1. Install and activate it. Go to Plugins, then Add New, search "RankMath," install, activate.
2. Run the Setup Wizard. RankMath will prompt you on first activation. Choose "Easy" mode.
3. Connect your Google account. The wizard asks for this - do it. It links RankMath to Google Search Console so you can see search performance data inside your WordPress dashboard.
4. Enable the XML sitemap. Your sitemap URL will be https://yourdomain.com/sitemap_index.xml - save this, you'll need it shortly.
5. Set your title format. Under General Settings, then Titles and Meta, configure how your browser tab titles are formatted.
6. Set a default schema type for posts. Under Titles and Meta, then Posts, choose "Article" as the default schema. This helps Google understand your content type.
Third: Connect Google Search Console
Google Search Console is free and shows you which search queries bring people to your blog, which pages are indexed, and what technical issues need fixing. It's not optional.
- Go to search.google.com/search-console
- Click Add Property and enter your domain
- Choose the Domain property type
- Verify ownership - if you connected RankMath to Google above, this is automatic
- Go to Sitemaps in the left menu, enter your sitemap URL, and hit Submit
Give it 24 to 72 hours. Google will start sending data.
Step 7: Write and Publish Your First Blog Post
The last step in how to set up a WordPress blog step by step is publishing your first post. It doesn't need to be your best. It needs to exist.
The bloggers who do well aren't the ones who spend two weeks perfecting their first article. They're the ones who publish it, learn what didn't work, and write another one the following week. Getting something indexed matters more than getting something perfect when nobody has read your site yet.

Creating a Post in WordPress
- Go to Posts, then Add New
- Write your title at the top
- Write your content in the body (each paragraph, heading, or image is a "block" - press Enter to add a new one)
- Add a Featured Image in the right sidebar (appears in blog archives and social previews)
- Assign a Category - create a relevant one now; don't leave it as "Uncategorized"
- Tags are optional; don't overthink them
- Edit the Permalink to be short and keyword-focused (remove filler words like "a," "the," "and")
- In the RankMath panel: add your Focus Keyword, write a Meta Description, check your SEO score
- Click Publish
A Simple Structure That Works for Blog Posts
H1: Your post title (50–60 characters, keyword included) Opening paragraph: hook + quick answer to the main question H2: First main section H3: Sub-point or supporting detail H2: Second main section H3: Sub-point H2: FAQs if relevant Closing paragraph with a next step for the reader
Paragraphs of 2 to 4 sentences. Images every 300 to 400 words. Headings to break up anything that reads like a wall of text. That's it.
Before You Hit Publish
- RankMath SEO score is green (above 80/100)
- Your focus keyword appears in the title, the first paragraph, and at least one subheading
- Meta description is written and under 160 characters
- Featured image is set with descriptive alt text
- Post is in a real category, not "Uncategorized"
- Permalink is clean and keyword-focused
- Preview the post on mobile before publishing
WordPress Security: Don't Skip This Section
Most beginners skip security setup and regret it. WordPress is the most targeted CMS on the web, not because it's insecure by design, but because its market share makes it worth attacking at scale. Basic hardening stops the vast majority of attacks before they start.
Five Things to Do Right After Installing WordPress
1. Change the admin username if you used "admin." Create a new user account with Administrator permissions and a different username. Log in as that user, then delete the original "admin" account.
2. Install and configure Wordfence. Activate it, run an initial scan, turn on the firewall, and set the login attempt limit to 3 before lockout.
3. Enable two-factor authentication. Wordfence's free version includes 2FA. Enable it for your admin account. Google Authenticator or Authy both work.
4. Keep everything updated. Go to Dashboard, then Updates, and run all available updates after initial setup. Enable automatic minor updates for WordPress core.
5. Set up automated backups. Configure UpdraftPlus to run weekly backups and store them to Google Drive or Dropbox. If your host includes daily backups in your plan, confirm they're actually enabled.
Getting SSL (HTTPS) on Your Blog
An HTTP blog in 2026 is a problem. Browsers display "Not Secure" warnings on non-HTTPS sites, which kills trust. Google uses HTTPS as a ranking factor. And most hosts now include free SSL through Let's Encrypt anyway.
Check whether SSL is already active by typing your domain with https:// in your browser. If it loads without a warning, you're set.
If it's not active:
- Go to your hosting control panel
- Find SSL/TLS or SSL Certificates
- Click Install Free SSL or Let's Encrypt
- Wait 5 to 15 minutes
- In WordPress: go to Settings, then General, and change both site URLs from http:// to https://
- Install the "Really Simple SSL" plugin to handle redirects automatically
Post-Launch Checklist
After your blog is live and your first post is published, work through this before you start promoting anything.
Technical
- HTTPS active and loading correctly on all pages
- www and non-www versions redirect to the same version (no duplicate home page)
- WordPress, themes, and plugins are all up to date
- XML sitemap submitted to Google Search Console
- Robots.txt is accessible at yourdomain.com/robots.txt
- Mobile PageSpeed Insights score is 70 or above
- Wordfence firewall is active
- Backups are scheduled and confirmed working
- Google Analytics 4 is installed
SEO
- Permalink structure is set to Post Name
- RankMath is configured and connected to Google
- Sitemap submitted to Google Search Console
- Homepage has a clear H1 with your target keywords
- Every published post has a unique meta title and meta description
- No posts are sitting in "Uncategorized"
- Each post has a focus keyword set in RankMath
- At least 2 to 3 posts have internal links connecting them
Content
- About page is published (with your name, background, and why you're writing this blog)
- Contact page with a working form
- Privacy Policy page published (required for Google AdSense approval and GDPR compliance)
- Disclaimer page if you're doing affiliate marketing
- At least 3 to 5 posts published before you start actively promoting
Common Setup Mistakes (and How to Fix Them)
Using WordPress.com instead of WordPress.org. You can't add plugins, can't run ads, and you don't fully own your content. Fix: start over with self-hosted WordPress.org. It's an afternoon of work, not a week.
Choosing hosting based on the lowest advertised price. Sub-$1/month unlimited plans usually mean overcrowded servers, poor uptime, and support that doesn't respond. Fix: check uptime reports on third-party review sites before buying. Hostinger and SiteGround both have transparent uptime records.
Skipping the permalink setup. Your blog runs on ?p=123 URLs. Fixing this after publishing requires creating a 301 redirect for every single post. Fix: set it to Post Name right now, before anything is published.
Installing every plugin that looks useful. 25 active plugins create load time drag, increase the chance of conflicts, and make debugging harder. Fix: start with 7, add more only when you have a specific need a current plugin can't cover.
Not setting up backups. A plugin conflict, a bad update, or a hack can wipe a blog with no recovery option. Fix: configure UpdraftPlus for weekly backups to remote storage before you publish your first post, not after.
What to Do After Your Blog Is Live
Getting WordPress installed and your first post published is the start, not the finish. A few things that will matter over the next 90 days:
Publish consistently. One post per week is more effective than five posts in the first week and nothing afterward. Google's crawl frequency adjusts to your publishing cadence.
Build your internal linking structure. Every new post should link to at least one older post where relevant. This builds topical authority and helps Google understand the relationships between your content.
Set up Google Analytics 4. Search Console tells you how people find your blog. GA4 tells you what they do once they're there. Both are free, both are necessary.
Start a content plan. Identify 20 to 30 topics your target reader actually searches for. Use Google's "People Also Ask" section, Answer the Public, or even just Google autocomplete. That list is your publishing roadmap for the next few months.
Don't touch your design constantly. Beginners spend weeks tweaking their theme when they should be writing. Pick a clean theme, make it readable, and leave it alone. Content is what grows a blog. Design adjustments can wait.
Now you know exactly how to set up a WordPress blog step by step. The hardest part is not the technical setup, it is publishing consistently after launch.
Frequently Asked Questions
Can I set up a WordPress blog for free?
Partially. WordPress.org software is free. You can't avoid paying for hosting (~$3/month) and a domain (~$10/year) if you want a self-hosted blog at your own domain. WordPress.com has a free plan, but it puts WordPress branding in your URL and blocks you from installing plugins or running ads. For a blog you're serious about, budget $44 to $60 for year one.
What's the difference between WordPress.com and WordPress.org?
WordPress.org is software you install on your own hosting. You own everything, can install any plugin, and can monetize however you want. WordPress.com is a hosted service that handles the server for you but locks down features until you pay for upgraded plans. For full control, which is what most bloggers need, use WordPress.org.
How long does WordPress blog setup actually take?
The bare installation takes about 10 minutes. A properly configured blog with a theme, the essential plugins, SEO setup, and security takes 2 to 4 hours. Writing your first post adds another hour. Most beginners finish a launch-ready blog in a single afternoon.
Which plugins do I actually need?
Seven: RankMath for SEO, LiteSpeed Cache for performance, Wordfence for security, UpdraftPlus for backups, Smush for image compression, Akismet for spam filtering, and Contact Form 7 for a contact page. That's it to start. Add more only when a specific need isn't being met.
How do I get my blog to show up on Google?
First, make sure Settings, then Reading, does not have "Discourage search engines from indexing this site" checked, new WordPress installs sometimes have this on by accident. Then submit your XML sitemap to Google Search Console. Google typically starts crawling within 3 to 10 days and your first posts appear in search results within 1 to 4 weeks, depending on content quality and how new the domain is.
What's the best hosting for a beginner?
Hostinger for price and speed (especially for South Asian audiences). SiteGround if you value good customer support over cost. Both include one-click WordPress installation and free SSL. Avoid "unlimited everything" plans from hosts you've never heard of.
Do I need technical skills to set up WordPress?
No. One-click installers require no coding. The dashboard is designed for non-technical users. You can write, publish, and manage a full blog without ever touching code. Knowing basic HTML helps eventually, but it's not something you need on day one.
How long does it take to set up a WordPress blog step by step?
Most beginners can set up a WordPress blog step by step in 2 to 4 hours using a one-click installer. The domain and hosting setup takes 30 minutes, WordPress installation takes 5 minutes, and theme and plugin configuration takes the rest.
Sources and References

Written by
Bibek Thapa
AI-Powered Digital Growth Strategist
Bibek Thapa works across AI workflows, SEO, AI search optimization, content strategy, website growth, and productivity systems. Anobee documents practical lessons, tools, experiments, and systems for improving digital presence.
- AI workflows
- Digital growth
- SEO
- GEO
- AEO
- Content strategy
- Website growth