
Website Growth
Google Tag Manager Setup Guide: From Install to GA4
By Bibek Thapa · Updated · 12 min read
Quick Answer
Create one Google Tag Manager web container for the site, install both container snippets in the positions Google specifies, and test the installation. Then add a Google tag with the site's GA4 tag ID, preview it in Tag Assistant, confirm data in GA4, and publish a named container version. Add custom events only after the base setup works.
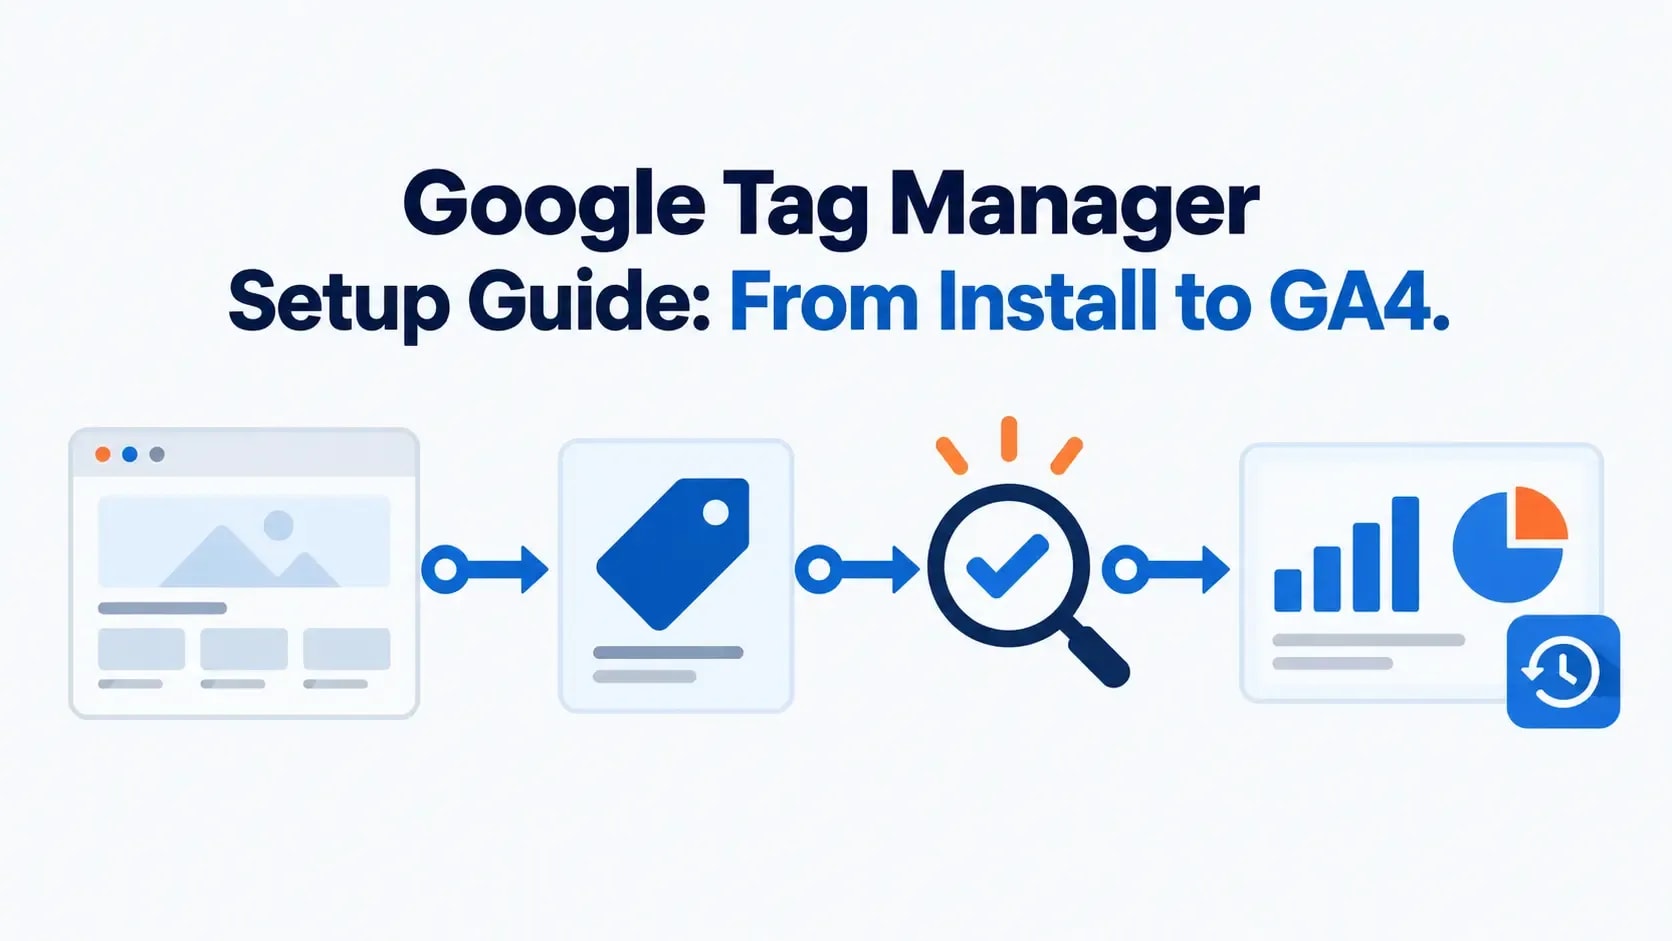
Table of ContentsOn this page
- What Google Tag Manager does
- Before you create the container
- Step 1: Create a Google Tag Manager account and web container
- Step 2: Install the GTM web container
- Step 3: Verify your Google Tag Manager setup
- Step 4: Add the GA4 Google tag
- Step 5: Preview and validate GA4
- Step 6: Publish a named version
- Step 7: Add one meaningful custom event
- Configure consent before expanding tags
- A maintainable GTM structure
- Common Google Tag Manager setup mistakes
- Final Google Tag Manager setup checklist
- Frequently Asked Questions
- Sources and References
Key Takeaways
- Install the web container before creating marketing tags, and use only one installation method.
- Use the current Google tag template for GA4; older tutorials may call it a GA4 Configuration tag.
- Preview every change in Tag Assistant and verify the destination before publishing a named version.
- Plan consent before adding analytics or advertising tags; Tag Manager does not make a site legally compliant by itself.
- Prefer stable data-layer events over fragile click-text or CSS-selector triggers for important conversions.
A sound Google Tag Manager setup begins with a modest milestone. The web container loads on every intended page, one GA4 Google tag sends data to the correct property, and you can prove both before publishing. Conversion events and advertising tags come later.
Adding five tags to an unverified container creates five possible faults at once. Start with the container, test one destination, and publish a named version. From there, extend the setup in small changes you can test on their own.
What Google Tag Manager does
Google Tag Manager (GTM) is a tag management system. You install a web container on the site, then use the Tag Manager interface to configure tags and the conditions that make them run. GTM does not replace Google Analytics. It can deploy the Google tag that sends data to a GA4 property, along with supported Google Ads and third-party tags.
Four parts appear throughout this guide:
- Tag: code or a configuration that sends data to a destination, such as Google Analytics.
- Trigger: a rule that listens for an event and determines when a tag fires.
- Variable: a placeholder for a value, such as the current page URL or transaction total.
- Data layer: structured information made available to Tag Manager for tags, triggers, and variables.
Google describes these components as a connected system: a trigger detects an event, a tag runs in response, and variables supply changing values [3].
You do not need GTM merely to install GA4. A website can install the Google tag directly instead. GTM becomes useful when you need centralized deployment, several measurement or advertising tags, custom events, a consent-aware setup, or a versioned change process.
Before you create the container
Before opening the interface, settle two questions: who owns the account, and what does the business actually need to measure?
Decide who owns the account
The organization should retain access if an employee, freelancer, or agency relationship ends. Use an organization-controlled Google identity where your security policy permits it, add at least one appropriate backup administrator, and grant each person only the access needed for their role.
Google recommends one Tag Manager account at the company level and a separate container for each website or app [1]. An agency can work inside the client's account without owning the only login.
Write a small measurement plan
List the decisions the data needs to support and the actions worth measuring. A simple service-site plan might include:
| Business action | Event | Useful values | Verification destination |
|---|---|---|---|
| Contact form succeeds | generate_lead | Form name, page path | GA4 DebugView and Realtime |
| Phone link is selected | click_to_call | Link URL, page path | GA4 DebugView |
| PDF is downloaded | file_download | File name, link URL | GA4 DebugView and reports |
Use GA4 recommended event names when a suitable one exists. Do not collect form contents, email addresses, phone numbers, or other personally identifiable information as event parameters.
Check what is already installed
Look for an existing GTM container and direct Google tag before adding anything. Search the page source for GTM- and googletagmanager.com, inspect Tag Assistant, and check CMS or plugin settings. If an existing container belongs to the organization, ask for access rather than creating a duplicate.
Step 1: Create a Google Tag Manager account and web container
Go to Google Tag Manager and sign in. Select Create Account, then complete the account and container fields:
- Use the company or organization name for the account.
- Select the account country.
- Use the website name or domain as the container name.
- Choose Web as the target platform.
- Create the container and accept the applicable terms.
The container ID appears in the workspace and begins with GTM-. Keep it distinct from a GA4 tag ID, which commonly begins with G-. The first identifies the Tag Manager container; the second identifies the Google tag destination used for Analytics.
Document the account name, container name, container ID, owner, and intended domain. This record becomes surprisingly useful once several similar containers appear in the account.
Step 2: Install the GTM web container
Select the GTM- container ID in the workspace to reopen the installation instructions. Google provides two snippets for each page:
- Place the first script as high in the
<head>element as possible. - Place the second
noscriptblock immediately after the opening<body>tag [2].
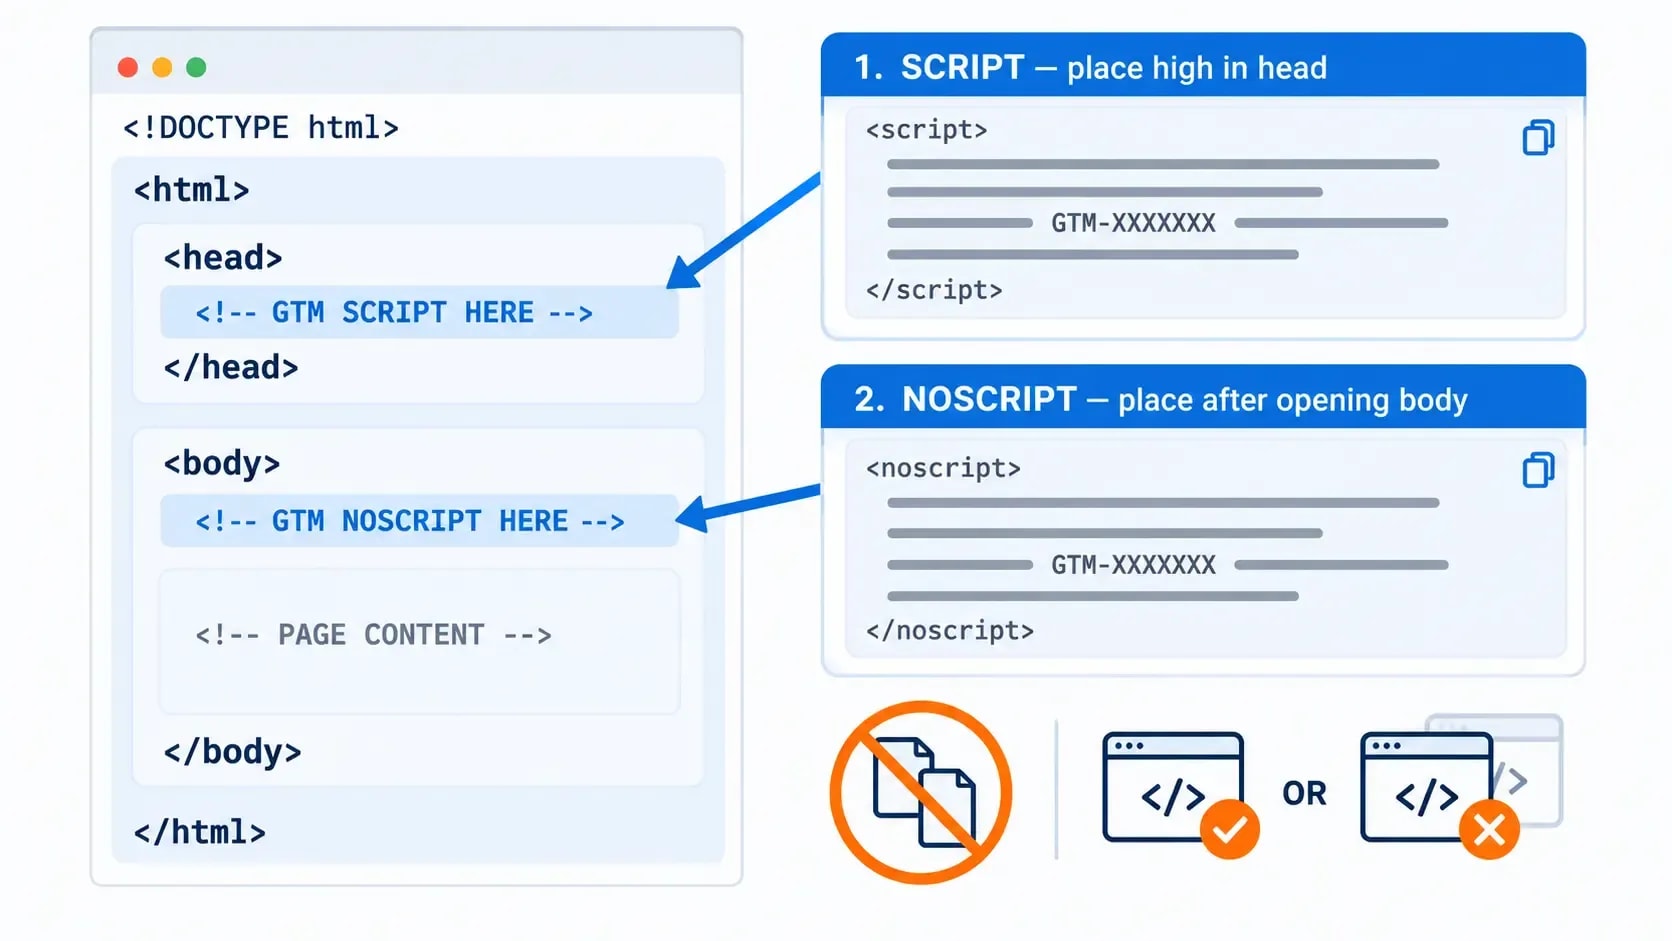
Copy the snippets from your own container instead of copying code from a tutorial. Your version contains the correct container ID.
Choose one installation method
Use one of these routes:
- CMS or website-builder integration: Enter the container ID in a supported native integration or trusted plugin.
- Theme or global-code setting: Add the snippets through a sitewide header/body code feature.
- Template deployment: Ask a developer to add both snippets to the site's shared layout.
Pick one route. Using a plugin while also pasting the snippets manually can load the container twice and duplicate tags or events.
For WordPress, avoid editing a parent theme's files through the Theme File Editor. A theme update can overwrite the change, and placing the noscript block correctly may be awkward. Prefer a maintained integration, an appropriate sitewide code mechanism, or a child-theme/developer implementation. After installation, clear page, server, and CDN caches that could still serve older HTML.
What the noscript block can and cannot do
The second snippet loads an iframe when JavaScript is unavailable. It does not make a JavaScript-dependent analytics implementation fully functional for visitors who disable JavaScript. Many tags, triggers, variables, and consent interactions still depend on JavaScript. Install the block because it is part of Google's web-container instructions, not because it guarantees complete no-JavaScript tracking.
Step 3: Verify your Google Tag Manager setup
Open a public page where the container should load. Then use at least two checks:
- In the GTM installation dialog, enter the website URL and select Test.
- In the workspace, select Preview, enter the URL, and connect the site to Tag Assistant.
Tag Assistant should show the container on the connected page. Browse to a few important templates—home, article, product or service, and confirmation pages—to confirm the container is not limited to one layout.
You can also inspect the page source or Network panel for your GTM- ID. A visible container request proves that GTM loaded; it does not prove that GA4 or a conversion tag sent correct data.
If Tag Assistant cannot connect, check the exact URL, cookie or consent behavior, browser extensions, Content Security Policy, redirects, and caches. Google's current troubleshooting notes also identify ad blockers, iframe loading, delayed tag loading, and the debug URL parameter as possible causes [5].
Step 4: Add the GA4 Google tag
You need a GA4 property and web data stream before this step. If those do not exist yet, complete the Google Analytics setup guide first.
Open the GA4 web data stream and copy its tag ID. Then return to the GTM web container:
- Select Tags → New.
- Give the tag a clear name, such as
Google tag - GA4 - example.com. - Select Tag Configuration → Google Tag.
- Paste the GA4 tag ID into Tag ID.
- Leave optional configuration fields alone unless the measurement plan requires them.
- Under Triggering, select Initialization - All Initialization Events.
- Save the tag.
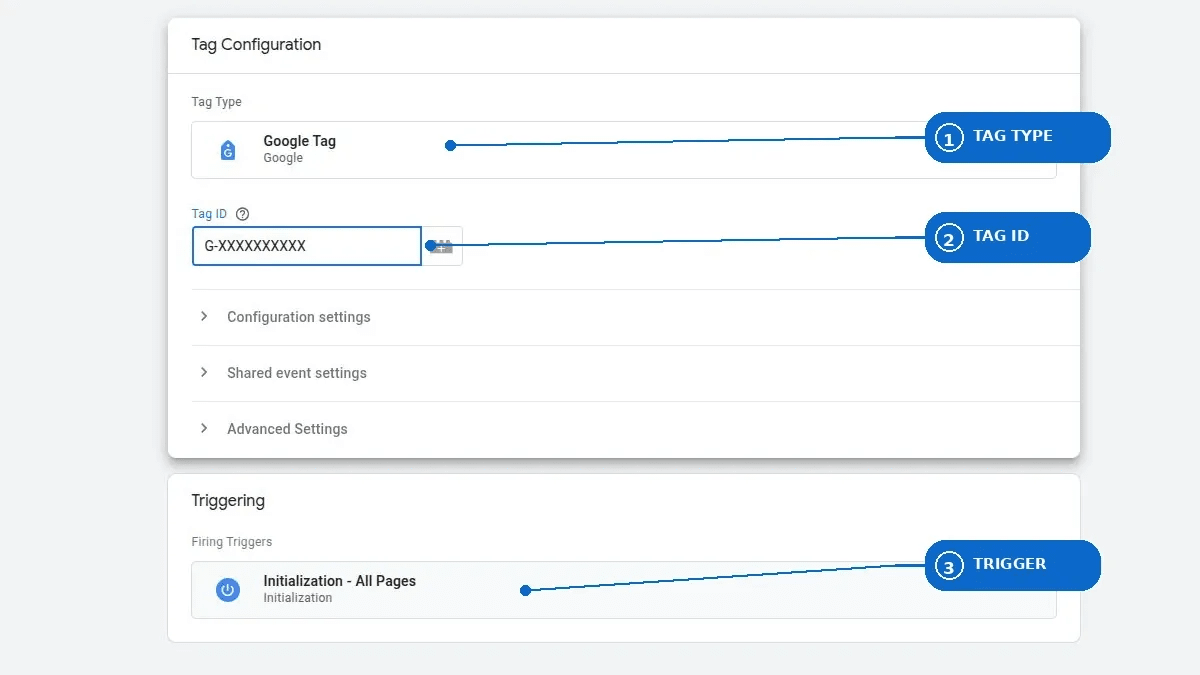
Google's current instructions use the Google Tag template and an Initialization trigger [4]. Older tutorials may call it a “Google Analytics: GA4 Configuration” tag or place it on an All Pages page-view trigger. Follow the current interface unless an existing implementation has a documented reason to differ.
Before previewing, check the site for a direct gtag.js installation that sends to the same GA4 property. If you are migrating GA4 into GTM, remove or disable the old route as part of a coordinated deployment. Leaving both active can duplicate events.
Step 5: Preview and validate GA4
At this point, the Google Tag Manager setup should have one saved Google tag. Select Preview in GTM, enter the site URL, and connect. Tag Assistant opens the site in a debug session and lets you inspect the event sequence, tags that fired, tags that did not fire, and the values passed to them [5].
Check the base setup:
- The correct GTM container connects.
- The Google tag fires on the initialization event.
- Its tag ID matches the intended GA4 web stream.
- Only one instance fires per page load.
- Navigation to another page produces the expected event sequence.
- Consent state matches the site's intended configuration.
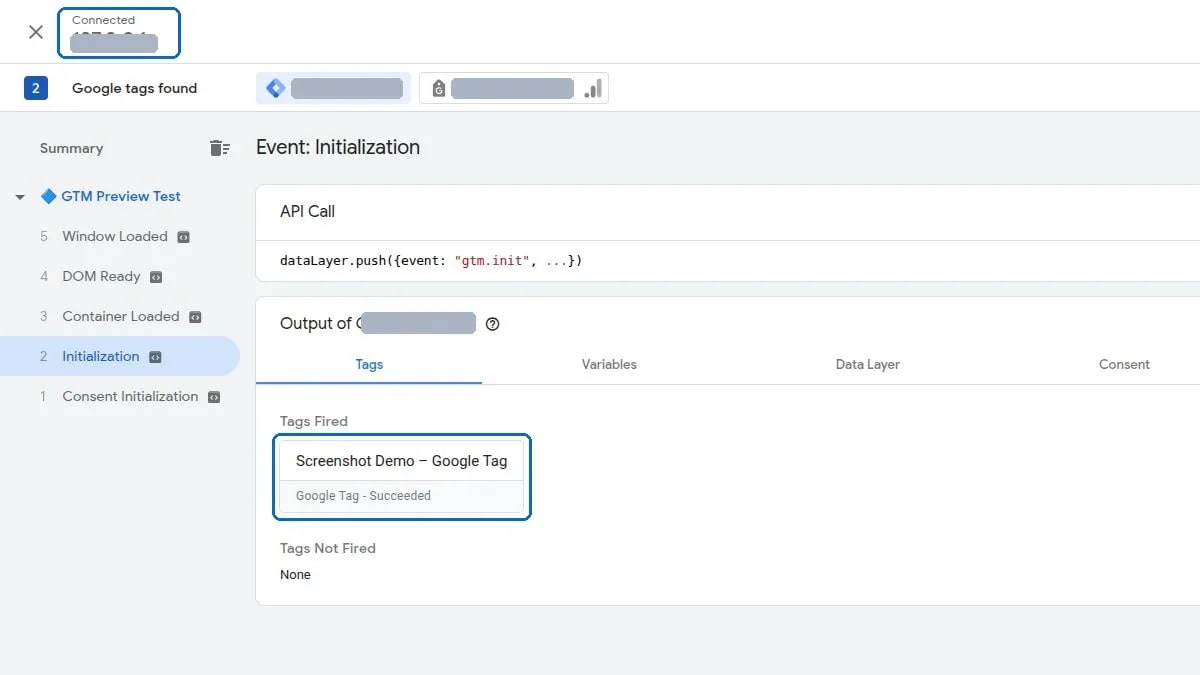
Next, open GA4 Admin → DebugView or the Realtime report and find your test visit. Allow for processing and filtering differences; Tag Assistant and DebugView answer different questions. Tag Assistant shows what happened in the container, while GA4 confirms that Analytics received and processed the event for the property you are viewing.
If the destination is wrong, the tag fires twice, or the expected page view is absent, leave the draft unpublished. Check one layer at a time: container presence, trigger behavior, tag configuration, network request, then destination reporting.
Step 6: Publish a named version
When the preview is clean, select Submit. Review the workspace changes, choose Publish and Create Version, and enter a specific name and description. For example:
- Version name:
Initial GA4 Google tag - Description:
Installed Google tag G-… on Initialization across the production web container; verified in Tag Assistant and GA4 DebugView.
Publishing makes the workspace changes active and records a container version [6]. That version is your recovery point. If a later release breaks measurement, you can publish an earlier version again.
Run one final test outside preview mode after publishing. Confirm the live container version loads and GA4 receives an ordinary visit. Preview proves the draft; the post-publish check proves production.
Step 7: Add one meaningful custom event
After the base tag works, add the highest-value event from the measurement plan. A confirmed contact-form submission usually tells you more than a collection of button clicks.
Prefer a data-layer event for critical actions
A developer can push a named event only after the business action succeeds:
window.dataLayer = window.dataLayer || [];
window.dataLayer.push({
  event: 'generate_lead',
  form_name: 'contact'
});
In GTM, create a Custom Event trigger with the event name generate_lead. Attach it to a Google Analytics: GA4 Event tag, use the same event name, and add only approved, non-sensitive parameters.
Google documents custom-event triggers as the route for interactions that standard trigger methods do not handle reliably, including altered form behavior. It also supports sending values with dataLayer.push() and reading them through data-layer variables [8].
Test three cases:
- A successful submission fires the event once.
- A validation error does not fire it.
- Refreshing the confirmation state does not create an unintended second event.
Use click triggers carefully
GTM can listen for link and element clicks, but Click Text equals Get a Quote is fragile. Copy changes, translation, nested elements, or a redesigned button can break it. If you must use a click trigger, prefer a stable ID, data attribute, or link URL and document the dependency.
A click also does not prove that a form, purchase, or booking succeeded. Measure the completed action whenever the platform exposes a reliable success event.
Configure consent before expanding tags
GTM provides a Consent Initialization trigger, built-in consent checks for supported tags, a Consent Overview screen, and APIs that consent tools can use. These controls help tags respond to a visitor's consent state. They do not determine which laws apply or turn a banner into a compliant implementation.
Choose the required consent behavior with qualified legal or privacy guidance. Then implement it through a suitable consent management platform (CMP) or a reviewed custom solution. Google recommends using a CMP template for Tag Manager when appropriate; custom templates should use Tag Manager's consent APIs rather than queueing gtag() consent commands that may run too late [7].
Test at least these states before publishing marketing tags:
- first visit before a choice;
- analytics denied;
- analytics granted;
- advertising denied and granted when applicable;
- a returning visitor with a stored choice;
- a visitor who changes or withdraws a choice.

Record the observed consent state and network behavior. Avoid blanket instructions such as “use advanced consent mode for every business.” The right mode and regional defaults depend on the organization's policies, products, advertising use, jurisdictions, and risk advice.
A maintainable GTM structure
Name items so another person can find them
A simple convention is enough:
Google tag - GA4 - example.comGA4 event - generate_leadTrigger - custom event - generate_leadDLV - form_name
The name should reveal the platform, item type, and purpose. Avoid internal codes that only one person understands.
Enable variables when you need them
Built-in variables are available for pages, clicks, forms, videos, scrolling, visibility, errors, and other contexts. Enable the set required by the current trigger instead of turning on everything on day one. A smaller workspace is easier to audit.
For values such as product IDs, revenue, content groups, or form names, prefer a documented data layer over scraping visible page text. The data layer creates a stable contract between the site and the measurement setup.
Release small changes
Bundle related items into one version, preview them, publish, and verify production. A version called Added lead form event is easier to understand and roll back than Updates.
For teams, use separate workspaces when concurrent changes would otherwise collide. Review workspace differences before publishing, especially when another version has gone live since the work began.
Common Google Tag Manager setup mistakes
Installing the same container twice
This often happens when a CMS plugin and manual template code are both active. Inspect the rendered source and Tag Assistant, then keep one installation route.
Confusing GTM- and G- IDs
The container snippet needs the GTM- ID. The GA4 Google tag inside that container needs the property's tag ID. Pasting one into the other's field will not create the intended setup.
Publishing without checking the destination
A tag can fire successfully and still send data to the wrong property or advertising account. Validate IDs and destination reports, not only the “Tags Fired” panel.
Counting clicks as completed conversions
A visitor can click Submit and still receive a validation error. Tie important events to a confirmed success state or backend result where possible.
Sending sensitive data
Form text, email addresses, phone numbers, and names should not be passed casually through URLs, event parameters, or data-layer objects. Review every variable used in a tag before publishing.
Assuming GTM improves site speed
The container offers centralized control; it does not make every tag cheap. Each deployed script can add network and processing work. Remove unused tags, avoid unnecessary Custom HTML, and measure the actual site rather than assuming asynchronous loading eliminates performance impact.
Treating consent mode as legal advice
Consent mode changes tag behavior based on supplied consent states. Your organization remains responsible for selecting lawful defaults, collecting valid choices, honoring withdrawal, and documenting the implementation.
Final Google Tag Manager setup checklist
- The organization controls the account and has appropriate backup access.
- One web container is assigned to the site and its intended domain is documented.
- The first snippet is high in
<head>and the second follows the opening<body>. - Only one installation method is active.
- Tag Assistant connects on every important page template.
- The GA4 Google tag uses the correct tag ID and current trigger guidance.
- No unintended direct GA4 copy duplicates the GTM deployment.
- GA4 DebugView or Realtime receives the test visit.
- Consent states are defined and tested before analytics or advertising expansion.
- The first conversion event represents a confirmed outcome, not an ambiguous click.
- No personal or sensitive form values are sent.
- Every release has a useful version name and description.
- Production is checked again after publishing.
Your Google Tag Manager setup is ready to grow once the foundation works. Build only the events your team will use. Connect that measurement plan to the conversion rate optimization process, or add Microsoft Clarity when session recordings and heatmaps can answer a defined behavior question. A larger container is not an achievement. A measurement setup people can trust is.
Frequently Asked Questions
Is Google Tag Manager the same as Google Analytics?
No. Google Tag Manager controls when tags run and what information they receive. Google Analytics collects, processes, and reports analytics data. You can deploy the GA4 Google tag through a Tag Manager web container.
Do I need both the GTM container ID and the GA4 tag ID?
Yes, when GA4 is deployed through GTM. The GTM container ID begins with GTM- and identifies the container installed on the site. The GA4 tag ID generally begins with G- and identifies the Analytics data stream receiving data.
Should I install GA4 directly and through Google Tag Manager?
Usually no. Running the same Google tag through both methods can duplicate page views or events. Choose one deployment route for each tag, document it, and confirm the live page does not load an unintended second copy.
Can Google Tag Manager track button clicks without code?
It can listen for clicks, but a reliable trigger needs a stable identifier or condition. Button text and CSS classes often change. For business-critical events, ask a developer to push a named event and its values to the data layer.
Does Google Tag Manager handle cookie consent?
GTM provides consent-related triggers, checks, and APIs, but it does not decide which consent rules apply to your organization. Use an appropriate consent management platform or implementation and have legal or privacy specialists determine the required behavior.
Can I roll back a bad Google Tag Manager publish?
Yes. Tag Manager stores container versions. You can select an earlier version and publish it again. A rollback restores the previous container configuration, but it cannot repair data that was missed or duplicated while the faulty version was live.
Sources and References
- Google Tag Manager Help — Create an account and container ↩
- Google Tag Manager Help — Install a web container ↩
- Google Tag Manager Help — Components of Google Tag Manager ↩
- Google Tag Manager Help — Set up Google Analytics in Tag Manager ↩
- Google Tag Manager Help — Preview and debug containers ↩
- Google Tag Manager Help — Publishing, versions, and approvals ↩
- Google Tag Platform — Set up consent mode on websites ↩
- Google Tag Manager Help — Custom event trigger ↩
Was this guide helpful?
Your answer helps Anobee improve future updates.

Written by
Bibek Thapa
AI-Powered Digital Growth Strategist
Bibek Thapa works across AI workflows, SEO, AI search optimization, content strategy, website growth, and productivity systems. Anobee documents practical lessons, tools, experiments, and systems for improving digital presence.
- AI workflows
- Digital growth
- SEO
- GEO
- AEO
- Content strategy
- Website growth