Website Growth
Google Analytics Setup Guide: GA4 for Websites (2026)
By Bibek Thapa · Updated · 10 min read
Quick Answer
To set up Google Analytics 4, create an account and GA4 property, add a web data stream, install its Google tag through one method, and test the result in Tag Assistant, Realtime, and DebugView. Do not install the same tag twice.

Table of ContentsOn this page
- What you need before starting
- Step 1: Create the Google Analytics account and GA4 property
- Step 2: Add a web data stream
- Step 3: Install the Google tag once
- Verify your Google Analytics setup
- Step 5: Configure the minimum useful settings
- Troubleshoot your Google Analytics setup
- Final Google Analytics setup checklist
- Frequently Asked Questions
- Sources and References
Key Takeaways
- Create a GA4 property and web data stream before installing anything on the website.
- Use one installation route: a native CMS integration, Google Tag Manager, or the Google tag placed directly in the site head.
- Verify deployment and data collection with Tag Assistant, Realtime, and DebugView.
- Review enhanced measurement, consent, key events, and internal-traffic filtering before relying on the reports.
- Never send names, email addresses, phone numbers, or other personally identifiable information to Google Analytics.
A Google Analytics setup guide can sound more complicated than the job itself. A basic GA4 installation has four parts: an Analytics account, a GA4 property, a web data stream, and one Google tag on the website. Realtime and DebugView then show whether that data is reaching the right property.
Still, this Google Analytics setup guide covers that foundation for a new website. It also deals with the choices behind many broken installs: picking the wrong property, adding the same tag through two methods, relying on an unpublished Tag Manager workspace, and testing while consent settings or browser extensions block collection.
Yet Google Analytics measures visits and events without deciding what matters to your business. Before opening the setup screen, write down one or two outcomes you eventually want to measure, such as a completed enquiry, purchase, or subscription. You will use those outcomes when you configure key events after the base tag works.
What you need before starting
Have these ready:
- A Google account controlled by the business or website owner
- Permission to create or edit a Google Analytics property
- Access to the website's CMS, global code settings, templates, or Tag Manager container
- The website's preferred reporting time zone and currency
- A clear decision about who will retain administrator access
For that reason, if an agency or freelancer is helping, the organization should still control the Analytics account. Instead, give collaborators the lowest access level they need instead of making an outside party the only administrator.
First, check whether Analytics is already installed. Use Tag Assistant and inspect the CMS settings or page source for a G- tag ID or a GTM- container ID. Adding a second implementation can duplicate page views and events.
Step 1: Create the Google Analytics account and GA4 property
Go to Google Analytics and sign in. For a first account, select Start measuring. Otherwise, if an account already exists, open Admin, select Create, and then choose Account or Property.
Use a durable business name for the account. Review the account data-sharing choices rather than accepting them unread; they control how account data may be shared with Google for specified purposes.
For the property:
- Enter a recognizable property name, usually the website or business name.
- Choose the reporting time zone used by the team.
- Choose the currency used for revenue reporting.
- Select the industry, business size, and business objectives that fit the site.
- Accept the applicable terms and create the property.
Google uses the chosen business objectives to tailor the default report collection. They do not change whether the tag can collect data. In particular, time zone and currency need more care because later changes affect reporting rather than rewriting historical data. Google's setup documentation explains those effects [1].
| Level | What it represents | Typical website setup |
|---|---|---|
| Account | The organization that owns the measurement | One business account |
| Property | The reporting container for a related digital experience | One property for the website or connected journey |
| Data stream | A source that sends data into the property | One web stream for the primary site |

In practice, do not combine unrelated businesses in one property just because the interface allows multiple streams. Instead, keep them together only when the sites belong to the same customer journey and the team wants unified reporting.
Step 2: Add a web data stream
Continue from property creation and choose Web. For an existing property, go to Admin → Data collection and modification → Data streams → Add stream → Web.
Next, enter the primary website URL and a clear stream name. Keep Enhanced measurement enabled for a typical content or small-business website, but review its settings. Additionally, it can collect scrolls, outbound clicks, site search, video engagement, file downloads, and some form interactions without extra event code. Leave on only the interactions that fit the site's measurement and privacy plan.
Verify your Google Analytics setupAfterward, select Create stream. Stream details displays a tag ID, commonly called the Measurement ID, in the format G-XXXXXXXXXX. Copy the ID from your own property rather than reusing one shown in a tutorial.

Step 3: Install the Google tag once
Then choose one installation route. The right choice depends on how the website is built and who will maintain its tracking.
| Installation method | Best fit | What to enter or install |
|---|---|---|
| Native CMS integration | The platform has a maintained GA4 field or official connection | Usually the G- tag ID |
| Google Tag Manager | The site uses GTM or needs centrally managed tags and custom events | A Google tag configured with the GA4 tag ID |
| Direct Google tag | A developer controls the shared template and no tag manager is needed | The complete gtag.js snippet |
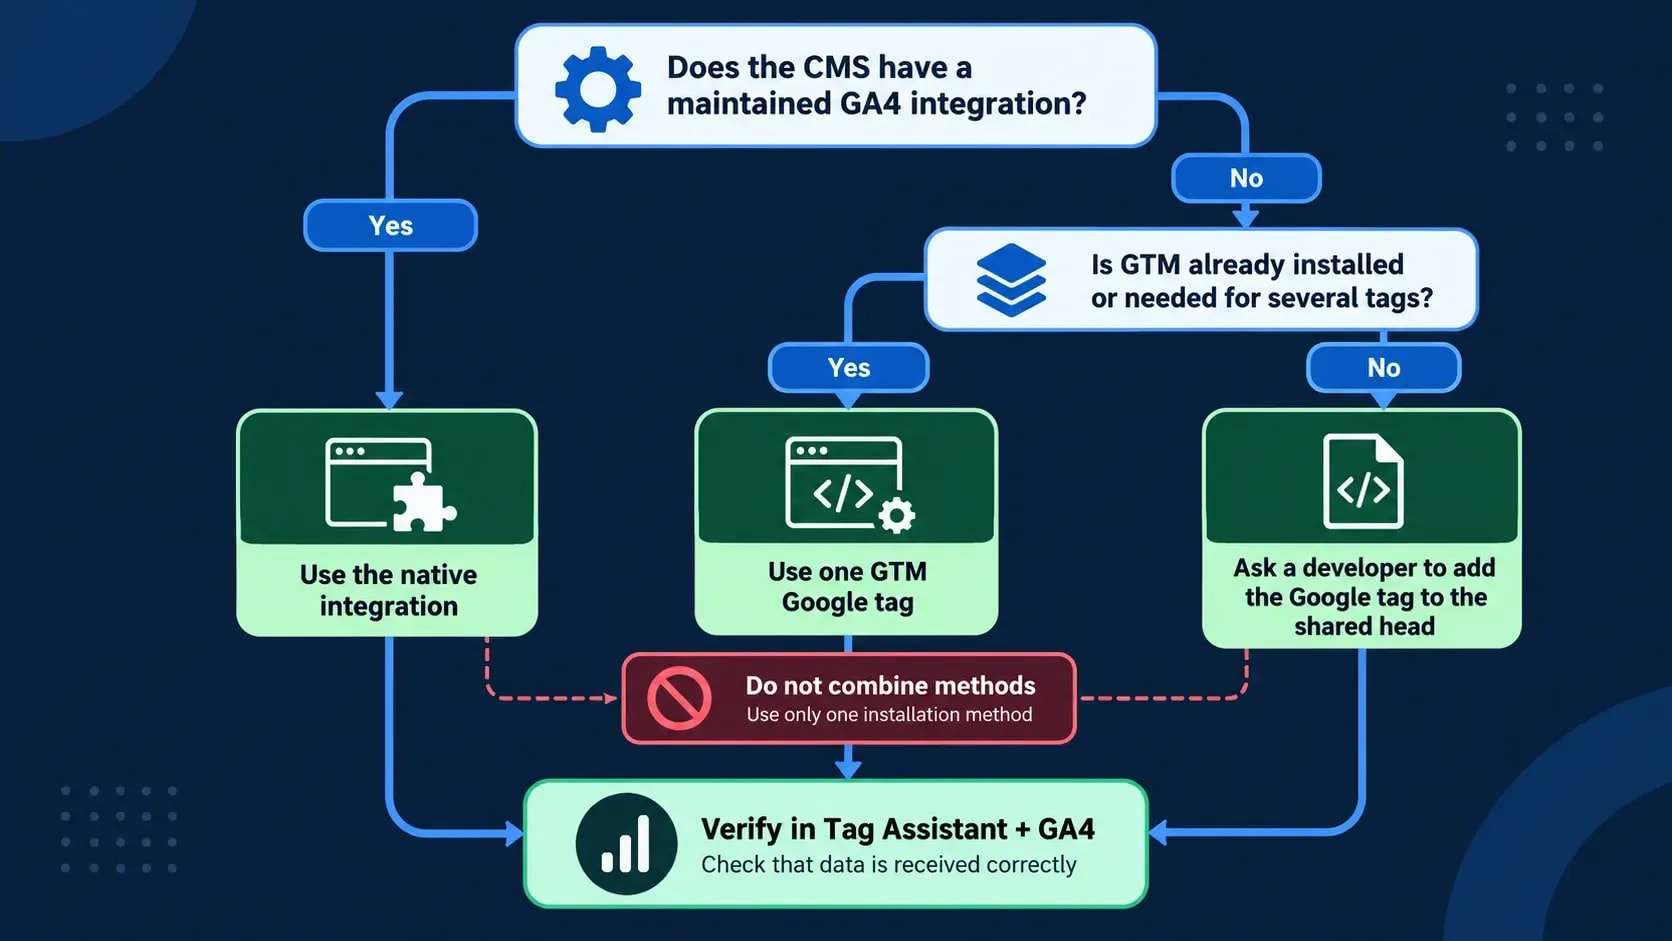
But do not use two routes for the same tag ID. A WordPress plugin plus a manually pasted Google tag can send the same event twice.
Option A: Use a supported CMS integration
For example, a maintained integration is usually the least fragile choice for a small website. Google publishes platform-specific installation paths and notes that accurate measurement requires the tag on every page [2].
Open the platform's Analytics settings, enter the G- tag ID if requested, save, publish, and clear relevant caches. Follow Google's instructions for that CMS instead of pasting a generic snippet into an arbitrary text field.
For WordPress, Site Kit by Google can connect the site to GA4 without editing a theme file. Avoid putting tracking code in a parent theme's header.php; a theme update can overwrite it, and a syntax mistake can affect the site.
Option B: Install GA4 through Google Tag Manager
By contrast, use this route if the site already has one properly installed GTM web container or needs a versioned workflow for several tags. But do not add a second container only for GA4.
- Open the correct web container and select Tags → New.
- Name the tag clearly, such as
Google tag - GA4 - example.com. - Choose Tag Configuration → Google Tag.
- Paste the GA4 tag ID into Tag ID.
- Under Triggering, choose Initialization - All Initialization Events.
- Save, select Preview, and connect the website in Tag Assistant.
- After a clean test, select Submit, publish, and create a named version.

Google's current Tag Manager instructions use the Google Tag template and an Initialization trigger [3]. However, older guides may tell you to create a GA4 Configuration tag; that is no longer the current route.
If GTM is not installed, use the complete Google Tag Manager setup guide first. Installing GTM requires both container snippets, which is outside this GA4-only procedure.
Option C: Add the Google tag directly
Alternatively, open the web stream, select View tag instructions, and choose Install manually. Copy the entire Google tag shown for that stream. Add it immediately after the opening <head> element on every page through the shared template or global code feature [1].
Otherwise, ask a developer to handle this if you cannot safely change the shared HTML. Clear application, page, and CDN caches after deployment. Test more than the homepage; a tag placed in one template can leave articles, products, or checkout pages unmeasured.
Verify your Google Analytics setup
Verification has two layers. First, prove that the tag loads on the website. Then prove that the intended GA4 property receives the events.
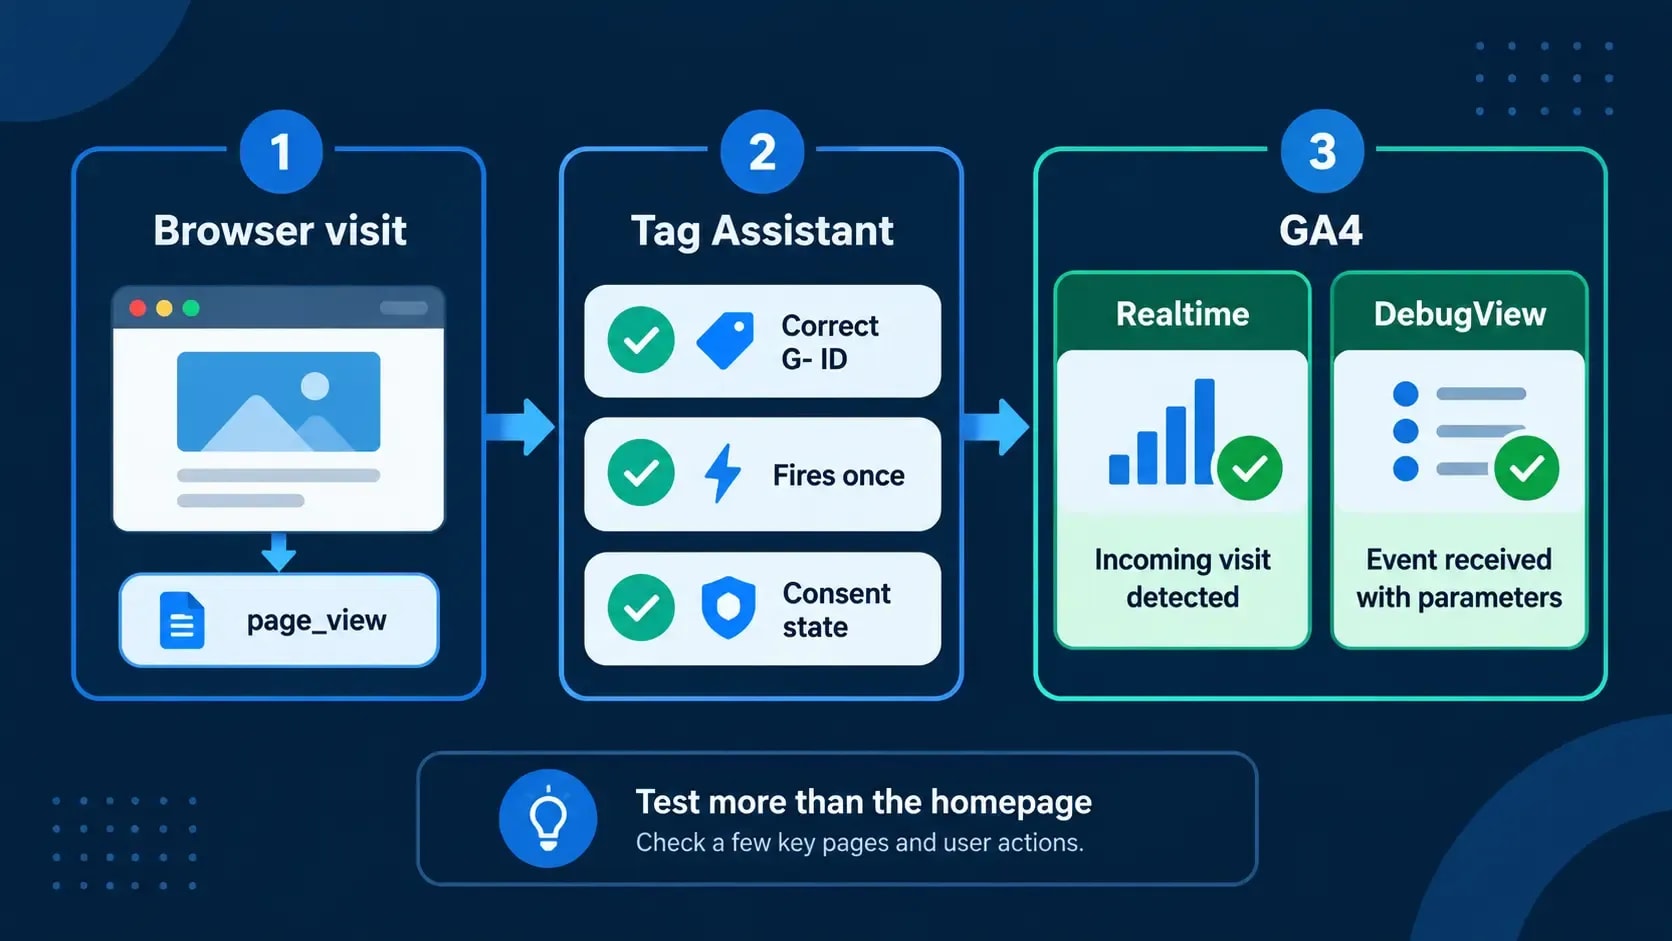
Check deployment with Tag Assistant
Open Tag Assistant, add the website URL, and connect. Next, browse several important page types during the debug session.
Confirm that:
- The connected domain is correct.
- The expected
G-tag ID appears. - The tag runs once per page load.
- Another page template still produces a page view.
- Consent state matches the site's intended configuration.
However, Tag Assistant proves only what the browser attempted to send. It does not replace checking the destination property.
Check Realtime and DebugView
Meanwhile, in GA4, open Reports → Realtime, then visit the website and navigate between a few pages. A correctly firing tag often appears within minutes. However, Google notes that initial data collection can take up to 30 minutes, so a short delay does not automatically mean failure [1].
For deeper troubleshooting, enable debug mode through Tag Assistant or GTM Preview and open Admin → Data display → DebugView. DebugView shows events and user properties collected from a debug-enabled device in real time [4].
Look for:
page_viewwhen a page loads or the route changessession_startfor the test session- Enhanced measurement events only when the relevant interaction occurs
- The correct page location and non-sensitive parameters
Never send names, email addresses, phone numbers, form contents, or other personally identifiable information as event names, values, or parameters.
Step 5: Configure the minimum useful settings
Still, an active page_view proves the base installation. It does not make the property decision-ready. A useful Google Analytics setup connects clean data to a small set of business outcomes.
Review consent and privacy requirements
The implementation must match the site's privacy notices, consent choices, contracts, and applicable law. Requirements vary by location and data use, so this is not legal advice.
In addition, if the business receives EEA traffic and uses Google advertising products, review Google's consent requirements and verify the signals sent by the implementation [5]. A consent banner and Consent Mode do different jobs: the banner asks for and records a visitor's choice; Consent Mode communicates applicable consent states to Google tags. Tag Manager alone does neither.
Also, test the tag before consent, after acceptance, and after rejection. DebugView may not display events when privacy controls or consent settings prevent Analytics collection [4].
Mark meaningful actions as key events
GA4 uses key event for an event that measures an action important to the business. A successful lead submission, purchase, or account creation can qualify; an ordinary page view usually does not.
First verify the underlying event in DebugView. Then mark the correct event as a key event. Google recommends checking key events in Realtime and using the Key events report for later reporting [6].
Instead, keep the list of important events small. A small set tied to real outcomes makes reporting easier to interpret.
Test internal-traffic filtering before activation
Visits from owners, staff, or an agency can distort a low-traffic site's reports. GA4 can identify internal traffic by IP rule and exclude it through a data filter.
Instead, start the filter in Testing state. An active exclude filter permanently prevents matching data from being processed [7]. Confirm the test results before switching it to Active.
Troubleshoot your Google Analytics setup
Use this Google Analytics setup guide as a troubleshooting sequence. Work through the system in order: website, tag, consent, network request, then destination property. Otherwise, changing several settings at once makes the cause harder to identify.
| Symptom | Likely cause | What to check |
|---|---|---|
| No tag in Tag Assistant | Missing code, wrong template, cache, content security policy, or unpublished deployment | Inspect the rendered page and test several templates |
| Tag appears but Realtime is empty | Wrong G- ID, wrong property, consent blocking collection, or browser extension | Compare the tag ID character by character and test a consented session in a clean browser profile |
| Page views appear twice | Direct tag and CMS/GTM installation both active | Inventory every installation route and keep one |
| Homepage works but articles do not | Tag exists only in one template | Move installation to the global layout or a supported sitewide integration |
| GTM Preview works but production does not | Workspace was saved but not published, or caching serves old HTML | Publish a named container version and clear caches |
| DebugView is empty | Debug mode is off, the wrong device is selected, or privacy controls block collection | Reconnect Tag Assistant, select the device, and inspect consent |
| Reports contain staff visits | Internal traffic is not identified or its filter is inactive | Define internal traffic, test the filter, then activate it deliberately |

Google's troubleshooting documentation recommends checking the Measurement ID, network requests, browser extensions, and consent configuration [8]. If no data appears after the initial processing window, repeat the checks with one installation method active and the correct property open.
Final Google Analytics setup checklist
- The business controls the Analytics account and has appropriate backup access.
- The GA4 property uses the intended time zone and currency.
- The web data stream points to the canonical production website.
- Enhanced measurement settings match the measurement and privacy plan.
- One installation method sends data to the correct
G-tag ID. - Tag Assistant detects the tag across important page templates.
- Realtime and DebugView receive the expected test events.
- No personally identifiable information appears in event data.
- Consent behavior has been tested for the site's relevant audiences.
- Important actions are verified before being marked as key events.
- Internal-traffic filters are tested before activation.
The standard Google Analytics product is available without a subscription charge; Analytics 360 is a separate enterprise offering [9].
Keep a short Google Analytics setup record with the property ID, stream ID, installation method, consent behavior, key events, and last verification date. It will make future troubleshooting faster and reduce the chance of a duplicate installation.
Once those checks pass, GA4 has a dependable starting point. The next useful step is not adding every possible event. It is connecting one important business action to a verified event, then using the reports to answer a real question.
This Google Analytics setup guide gives you a verified base. However, other tools can answer questions that GA4 alone cannot. For a second view of on-page behavior, Microsoft Clarity can add heatmaps and session recordings. Use it alongside GA4, not as proof that GA4 itself is configured correctly. When the data is stable, the conversion rate optimization guide explains how to turn those observations into a disciplined testing process.
Frequently Asked Questions
Is Google Analytics 4 free?
Google provides the standard Google Analytics product free of charge. Google Analytics 360 is a separate enterprise offering. Website, consent-management, implementation, or consulting costs may still apply.
How long does GA4 take to start showing data?
A correctly installed tag can appear in Realtime within minutes, but Google says initial data collection may take up to 30 minutes. If nothing appears, check the tag ID, consent state, browser blockers, and installation method.
Do I need Google Tag Manager to install GA4?
No. A supported CMS can accept the GA4 tag ID, and a developer can add the Google tag directly. Tag Manager is useful when you need centralized, versioned control over several tags or custom events.
Where do I find my GA4 Measurement ID?
Open Admin, select Data streams under Data collection and modification, then open the web stream. The Measurement ID appears in Stream details and commonly begins with G-.
Why is Google Analytics not showing my visit?
Common causes include a wrong tag ID, a tag installed on only some templates, unpublished Tag Manager changes, consent blocking analytics storage, browser extensions, filters, caching, or checking the wrong GA4 property.
Can one GA4 property track more than one website?
It can, but use one property only when the sites belong to the same user journey and need unified reporting. Put unrelated businesses or reporting needs in separate properties.
Sources and References
- Google Analytics Help — Set up Analytics for a website or app ↩
- Google Analytics Help — Install your Google tag with a website builder or CMS ↩
- Google Tag Manager Help — Set up Google Analytics in Tag Manager ↩
- Google Analytics Help — Monitor events in DebugView ↩
- Google Analytics Help — Verify and update consent settings ↩
- Google Analytics Help — Report on key events ↩
- Google Analytics Help — Filter out internal traffic ↩
- Google for Developers — Verify and troubleshoot Google Analytics ↩
- Google Marketing Platform — Analytics product overview ↩
Was this guide helpful?
Your answer helps Anobee improve future updates.

Written by
Bibek Thapa
AI-Powered Digital Growth Strategist
Bibek Thapa works across AI workflows, SEO, AI search optimization, content strategy, website growth, and productivity systems. Anobee documents practical lessons, tools, experiments, and systems for improving digital presence.
- AI workflows
- Digital growth
- SEO
- GEO
- AEO
- Content strategy
- Website growth