Freelancing & Online Business
How to Set Up a WordPress Blog Step by Step (2026 Beginner's Guide)
By Bibek Thapa · Updated · 18 min read
Quick Answer
Buy a domain and hosting, install WordPress through your host's one-click installer, pick a light theme, add a handful of plugins, set your permalinks before publishing, and write your first post. Setup takes one to two hours. Budget around $145 on day one if you want the lowest advertised monthly rate, because that price requires a four-year prepayment.
Table of ContentsOn this page
- What it costs to set up a WordPress blog
- Before you start
- Step 1: Register your domain name
- Step 2: Choose and set up hosting
- Step 3: Install WordPress
- Step 4: Choose a theme
- Step 5: Install the right plugins
- Step 6: Configure settings before you publish anything
- Step 7: Write and publish your first post
- Security worth doing on day one
- Post launch checklist
- Common setup mistakes
- What to do after the blog is live
- Bottom line
- Frequently Asked Questions
- Sources and References
Key Takeaways
- Hostinger's advertised $2.99/mo Premium rate is a 48 month prepayment of $143.52, and it renews at $10.99/mo.
- The headline monthly price and the renewal price are different numbers. Check both before you buy anything.
- A free domain for the first year is included with most hosting plans, so do not pay for one separately in year one.
- Namecheap includes free lifetime Whois privacy on new registrations, so treat any charge for it as optional.
- Google Workspace Business Starter is now $7 per user per month, up from $6.
- Set your permalinks to Post name before you publish anything. Changing them later breaks every existing link.
It costs less to set up a WordPress blog than most people expect, but not as little as the previous version of this guide claimed. It said "as little as $35 to $60 per year", and criticised other guides for skipping past real numbers. The criticism was fair. The figure was not.
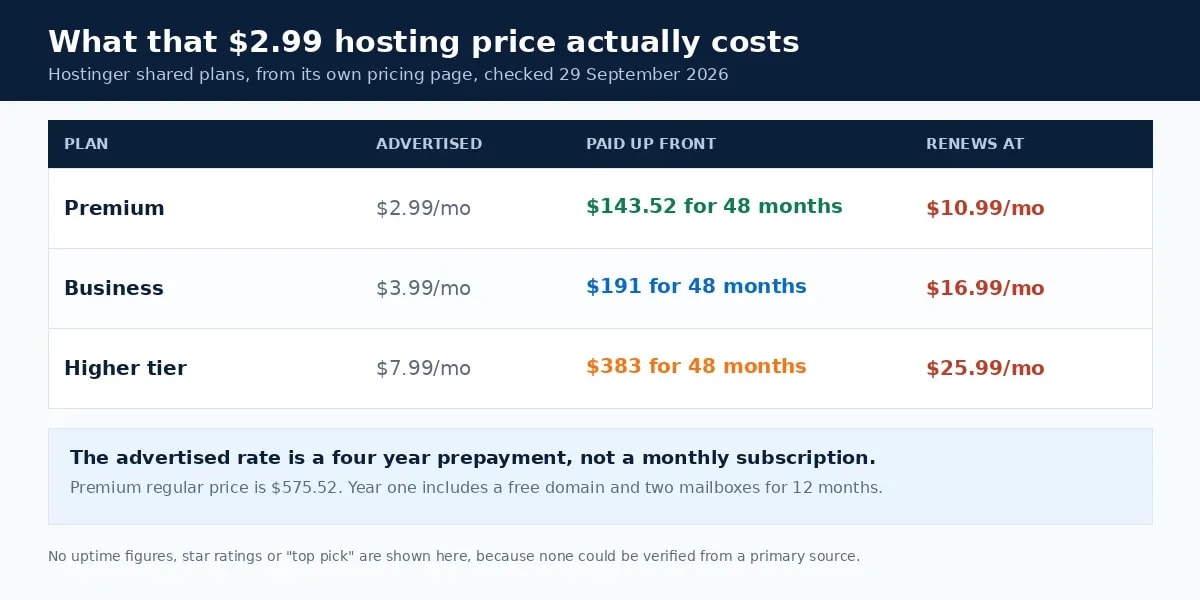
Checked on 29 September 2026, Hostinger's Premium plan advertises $2.99 a month. That rate is only available as a 48 month term billed at $143.52 upfront, against a regular price of $575.52, and it renews at $10.99 a month [1]. The annual average works out near $36. The cash you need on day one does not.
That distinction is the single most useful thing in this guide, so the cost section now leads with it.
What it costs to set up a WordPress blog
WordPress software is free. What you pay for is a domain name and web hosting: the address and the server space.
Hosting pricing is built to be read quickly and understood wrongly. Three different numbers get presented as one, so here they are separately, using Hostinger's shared plans as the worked example [1].
| Plan | Advertised rate | What you actually pay up front | Renews at |
|---|---|---|---|
| Premium | $2.99/mo | $143.52 for 48 months (regular $575.52) | $10.99/mo |
| Business | $3.99/mo | $191 for 48 months | $16.99/mo |
| Higher tier | $7.99/mo | $383 for 48 months | $25.99/mo |

Three things follow.
The advertised rate is a prepayment, not a subscription. To pay $2.99 a month you commit four years of hosting in one transaction. Shorter terms exist and cost more per month.
The renewal is the number that matters long term. At $10.99 a month, year five costs $131.88, which is roughly four times the advertised rate you signed up on. Put the renewal date in your calendar now, because that is when switching host is cheapest.
Year one includes things you would otherwise buy. Hostinger's Premium plan includes a free domain for 12 months and two mailboxes free for 12 months [1]. So the separate domain and email costs below apply from year two, not immediately.
Costs people get surprised by later
Domain renewal. A free first year is standard. Renewal is not free. Namecheap lists .com at about $11.28 for the first year and $14.98 on renewal.
Domain privacy. This hides your contact details from public Whois lookups. Namecheap includes it free for life on new registrations and transfers [2], so if something in your cart charges $5 to $15 for it, check whether you need to pay at all.
Professional email. The mailbox your host includes is fine to start. Google Workspace Business Starter is $7 per user per month, with a $6.30 introductory rate for the first 12 months for new customers [3]. Worth noting that this went up from $6, so older guides quoting that figure are out of date.
You can launch a real blog without spending more than the hosting prepayment. Just know which number you are agreeing to.
Before you start
Have these ready and the whole setup takes about an hour:
- A blog topic decided. Broad is fine at this stage, and the guide to choosing a profitable niche covers narrowing it later.
- Two or three domain name options, in case your first choice is taken.
- A payment method.
- An email address you check.

Step 1: Register your domain name
Your domain is your blog's address. It is also the one decision that is genuinely hard to undo, because it becomes your brand and your email address.
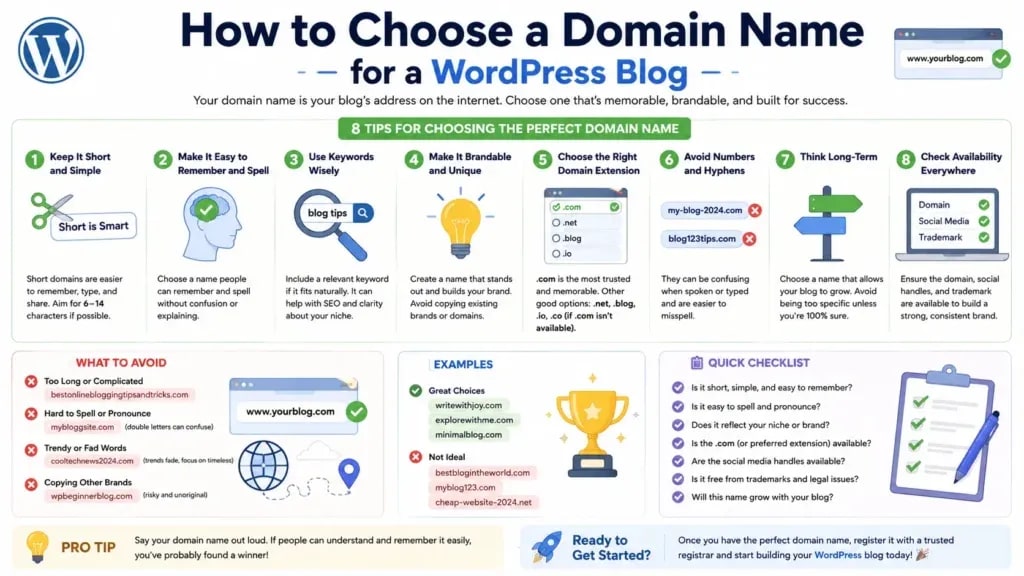
What makes a good domain name
- Short beats clever. Under 15 characters if possible. Long domains get mistyped and look messy in print.
- Say it out loud. If you have to add "that's two words, no hyphen, with a Z" every time, it is the wrong name.
- Skip hyphens. A name like best-tech-blog-2026.com reads as spam in search results and ages badly.
- Brand over keyword. Exact match keyword domains do not carry the advantage they once did. TechWithMaya.com is a better long term bet than techblog2026.com.
- Go .com first. It still carries the most recognition globally. For Nepal targeted content, .com.np is a credible local option.
Where to register
If your host offers a free domain for the first year, take it. That is the cheapest path and it is included on most shared plans [1]. Otherwise Namecheap or Cloudflare Registrar are the cheapest over time.
Avoid domains containing trademarked words, domains where a competitor holds the .com, and your full legal name if you might sell the site later.
Step 2: Choose and set up hosting
Hosting is the server that stores your WordPress files and serves them to visitors. It is the only part of setting up a WordPress blog that costs real money.
Shared or managed
Shared hosting puts your blog on a server with many other sites. It costs a few dollars a month on a long term and is more than adequate until you are consistently seeing five figures of monthly traffic.
Managed WordPress hosting is tuned for WordPress, with updates and backups handled for you. It starts around $20 to $35 a month and makes sense once traffic justifies the cost.
Start with shared. The reason most new blogs fail has nothing to do with hosting. It is publishing inconsistency.
What to check before you pay
- The renewal price, not just the promotional one.
- The term required for the advertised rate.
- Whether a domain is included, and for how long.
- Server location. Hostinger has servers in Singapore and India, which matters for South Asian visitors.
Setting up the account
- Pick a starter plan. You can upgrade later.
- Enter your domain, or register one through the host.
- Fill in your account details.
- Choose the term deliberately, now that you know what the advertised rate requires.
- Complete payment and check your email for login credentials.
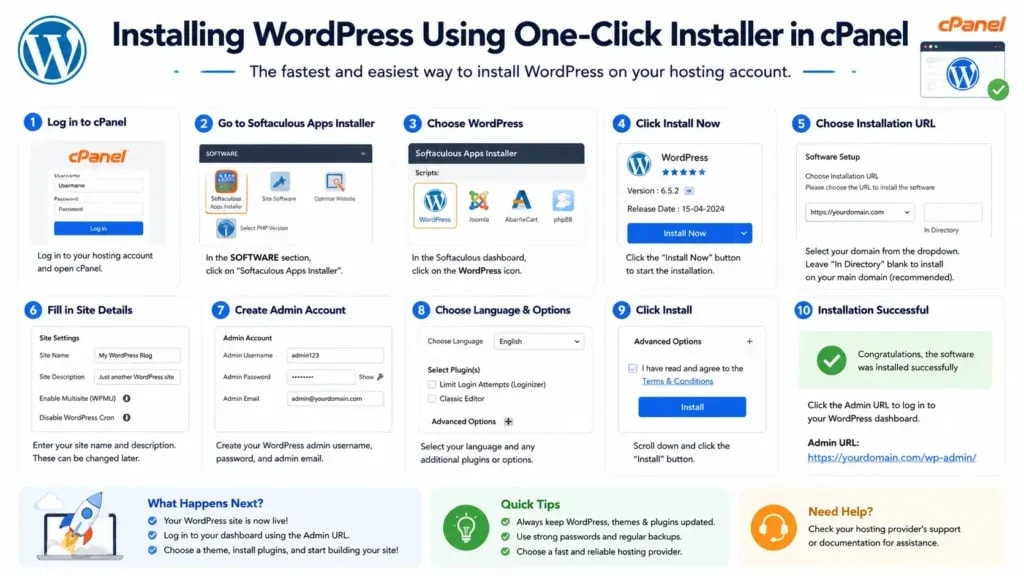
Step 3: Install WordPress
This is the step people expect to be hard, and it is the easiest part of setting up a WordPress blog. Almost every major host includes a one click installer, and the whole thing takes about three minutes.
Via cPanel, the most common: log into your control panel, find "WordPress Installer", "Softaculous" or "WordPress Manager", click Install Now, fill in the settings, and wait two to three minutes.
Via Hostinger's hPanel: go to Websites, then Add Website, select WordPress, and follow the guided setup.
Via SiteGround Site Tools: go to WordPress, then Install and Manage, and complete the fields.
One setting is worth repeating. Do not use "admin" as your admin username. Changing it takes five seconds and closes a very common attack route.
Your login page is at https://yourdomain.com/wp-admin. Bookmark it.

Step 4: Choose a theme
Your theme controls how the blog looks, and also how fast it loads, which feeds into Core Web Vitals.
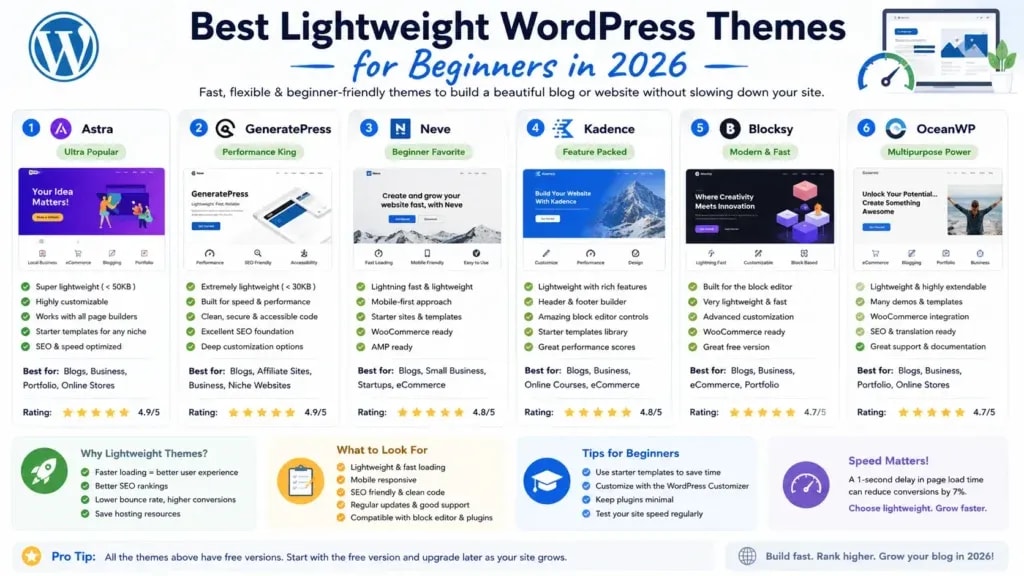
Judge a theme on four things: recent updates, a large active install count, reviews that mention current versions, and demo pages that load quickly on a phone.
Astra Free is the most practical starting point for most blogs. GeneratePress is the choice if load speed is your priority, because it is genuinely one of the lightest themes available. Both are in the WordPress theme directory [4].
Do not buy a premium theme in week one. You do not yet know what you need.
Step 5: Install the right plugins
Seven plugins cover a new blog:
| Job | Plugin | Note |
|---|---|---|
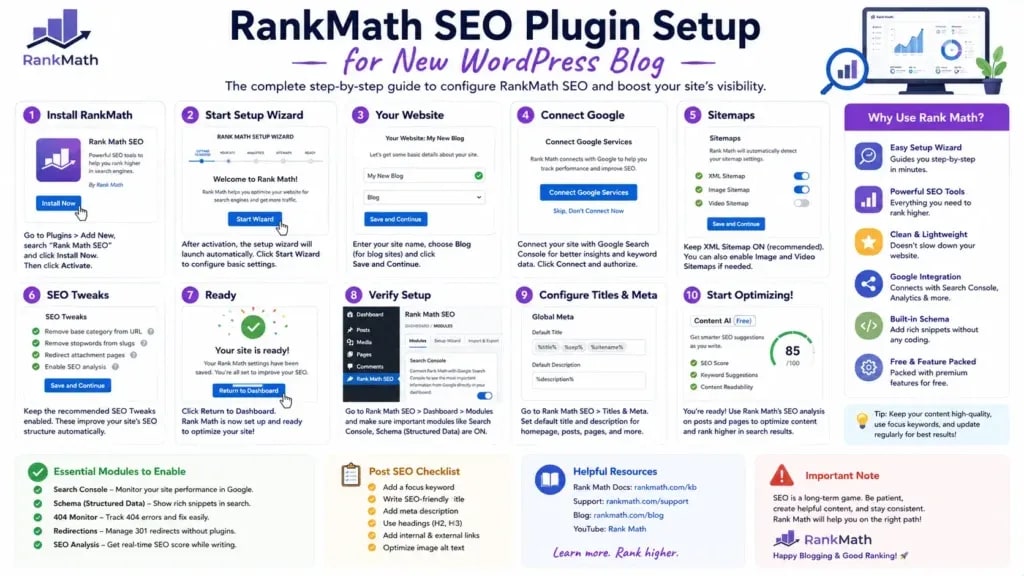
| SEO | Rank Math | Never run alongside Yoast |
| Caching | LiteSpeed Cache | Matches LiteSpeed servers, which Hostinger uses |
| Security | Wordfence | Free tier includes two factor authentication |
| Backups | UpdraftPlus | Schedule weekly to remote storage |
| Images | Smush | Compress on upload |
| Spam | Akismet | Free for personal blogs |
| Contact | Contact Form 7 | Or any light form plugin |
Two rules. Never run two SEO plugins at once, because Rank Math and Yoast conflict in ways that break things quietly. And skip page builders such as Elementor or Divi if you are only writing posts, because they add weight you do not need.

Step 6: Configure settings before you publish anything
This step is out of order in most guides, and the order matters.
- Permalinks. Settings, then Permalinks, then Post name. Do this before your first post. Changing the structure later breaks every link you have published.
- Site title and tagline. Settings, then General.
- Search engine visibility. Settings, then Reading. Make sure "Discourage search engines" is unchecked.
- SSL. Your host should issue a free certificate. Confirm the site loads over
https://. - Delete the samples. The Hello World post and the sample page.
The technical SEO guide covers what to check once the site has some posts on it.
Step 7: Write and publish your first post
Open Posts, then Add New. Write a real post rather than a placeholder.
Before publishing, set a focus keyphrase in Rank Math, write a meta description, add alt text to every image, and pick a category. Compress images before upload, since images are usually the heaviest thing on a blog page and the image optimization guide covers the sequence.
Publish it. A blog with one honest post is further along than a blog with a perfect theme and nothing to read.

Security worth doing on day one
- Install and configure Wordfence, and turn on two factor authentication, which the free version includes.
- Configure UpdraftPlus for weekly backups to Google Drive or Dropbox, before your first post rather than after.
- Use a password manager and a long unique admin password.
- Keep WordPress core, themes and plugins updated. Most compromises exploit known holes in outdated software.
- Delete themes and plugins you are not using. Inactive code is still code on your server.
Post launch checklist
- Permalinks set to Post name
- SSL active and the site loading over HTTPS
- Sample post and page deleted
- Search engine visibility enabled
- Backups scheduled and tested once
- Contact page published
- Privacy policy published
- An analytics property connected
Common setup mistakes
- Buying the cheapest plan without reading the term. Sub $1 a month unlimited plans usually mean overcrowded servers and support that does not answer.
- Changing permalinks after publishing. This breaks every existing link. Set it once, at the start.
- Installing twenty plugins in week one. Each one is code that can slow or break the site. Start with seven.
- Skipping backups. Configure UpdraftPlus before you publish, not after something goes wrong.
- Buying a premium theme immediately. Free themes are genuinely good now, and you do not yet know your requirements.
- Forgetting the renewal date. The cheap rate ends. Diarise it while you still remember.
What to do after the blog is live
Publishing consistently matters more than anything else on this page. Beyond that, connect Search Console so you can see which queries find you, start an email list early because it is the only audience you own outright, and leave monetisation until you have traffic worth monetising.
Bottom line
You can set up a WordPress blog in one to two hours, and the software is free. The part worth slowing down on is the hosting checkout, because the advertised monthly rate, the required term, and the renewal rate are three different numbers, and only one of them is on the button you click. Know which you are agreeing to, take the free first year domain, set permalinks before you publish, and spend the rest of your energy on posts.
Frequently Asked Questions
How much does it really cost to start a WordPress blog?
WordPress itself is free. Hosting is the real cost, and the advertised monthly rate is rarely what you pay. Hostinger's Premium plan advertises $2.99 per month, which is a 48 month prepayment of $143.52, renewing at $10.99 per month. A free domain for the first year is usually included. Expect roughly $145 on day one for the cheapest advertised rate, or a higher monthly figure on a shorter term.
Do I need to pay for a domain separately?
Usually not in the first year. Most shared hosting plans include a free domain for 12 months. After that a .com renews at roughly $15 a year. If you register separately, Namecheap lists .com at about $11.28 for the first year and $14.98 on renewal, with free lifetime Whois privacy included.
Which plugins does a new WordPress blog actually need?
Seven cover it: an SEO plugin such as Rank Math, a caching plugin matched to your server, Wordfence for security, UpdraftPlus for backups, an image compression plugin, Akismet for spam, and a contact form plugin. Never run two SEO plugins at once, because Rank Math and Yoast conflict in ways that break things quietly.
Is shared hosting good enough to start?
Yes, for almost every new blog. Shared hosting handles a site comfortably until you are consistently seeing five figures of monthly traffic. Managed WordPress hosting starts around $20 to $35 a month and only makes sense once traffic justifies it. The thing that kills new blogs is inconsistent publishing, not the server.
What should I do before publishing my first post?
Set permalinks to Post name, install an SSL certificate so the site loads over HTTPS, delete the sample post and page, set your site title and tagline, and make sure the Discourage search engines box is unchecked. Permalinks matter most because changing the structure later breaks every link you have already published.
Sources and References
Was this guide helpful?
Your answer helps Anobee improve future updates.

Written by
Bibek Thapa
AI-Powered Digital Growth Strategist
Bibek Thapa works across AI workflows, SEO, AI search optimization, content strategy, website growth, and productivity systems. Anobee documents practical lessons, tools, experiments, and systems for improving digital presence.
- AI workflows
- Digital growth
- SEO
- GEO
- AEO
- Content strategy
- Website growth