
Website Growth
Google Tag Manager Setup Guide: Install GTM, Configure GA4, Track Conversions and Implement Consent Mode (2026)
Learn how to Google Tag Manager setup guide step by step. Install GTM, configure GA4, track conversions, and implement Consent Mode v2. Start in minutes.

By Bibek Thapa · Published Jun 12, 2026 · Updated Jul 20, 2026 · 14 min read
Quick Answer
Quick Answer: This Google Tag Manager setup guide covers GTM, a free tag management system from Google that lets you install and manage tracking scripts (including GA4, Google Ads, and third-party pixels) through a single interface without editing website code. Setup takes roughly 30 minutes: create a GTM account, install the snippet on your site, then configure your GA4 tag inside the GTM…
Table of Contents
- What Is Google Tag Manager?
- How GTM Works: Tags, Triggers, and Variables Explained
- GTM vs. Direct Code Installation: Why GTM Wins
- The TRACK System: A Google Tag Manager Setup Guide Framework
- Step 1: Create Your GTM Account and Container
- Account vs. Container: What Is the Difference?
- How to Create a GTM Account
- Choosing the Right Container Type
- Step 2: Install the GTM Snippet on Your Website
- How to Install GTM on WordPress
- How to Verify Your GTM Installation
- Step 3: Set Up Your GA4 Configuration Tag in GTM
- Finding Your GA4 Measurement ID
- Configuring the Google Tag for GA4 in GTM
- Setting Up Enhanced Measurement
- Step 4: Configure Event Tracking and Conversion Tags
- Setting Up GA4 Event Tags for Custom Actions
- Tracking Button Clicks
- Google Ads Conversion Tracking via GTM
- Step 5: Implement Consent Mode v2 for GDPR Compliance
- Basic vs. Advanced Consent Mode: Which Do You Need?
- Connecting a CMP to GTM Consent Mode
- GTM Variables: The Engine Behind Smart Tracking
- Built-In Variables to Enable Immediately
- The Data Layer: What It Is and How to Use It
- Google Tag Manager Setup Guide: Debugging with Preview Mode and Tag Assistant
- How to Use Preview Mode Step by Step
- Common GTM Issues and How to Fix Them
- Using Google Tag Assistant for Validation
- GTM Best Practices and Common Mistakes
- Naming Conventions That Scale
- Version Control and Workspaces
- Seven GTM Mistakes That Break Your Tracking
- Advanced GTM: Server-Side Tagging (When You Are Ready)
- What Is Server-Side GTM and When Should You Use It?
Quick Answer: This Google Tag Manager setup guide covers GTM, a free tag management system from Google that lets you install and manage tracking scripts (including GA4, Google Ads, and third-party pixels) through a single interface without editing website code. Setup takes roughly 30 minutes: create a GTM account, install the snippet on your site, then configure your GA4 tag inside the GTM dashboard.
This Google Tag Manager setup guide starts with one assumption: you have opened your website's source code and found 15 different JavaScript snippets crammed into the <head>, you already understand the problem this Google Tag Manager setup guide addresses. GTM replaces that chaos with a single container you control from a visual dashboard. No more deployment requests every time a tag changes.
What follows is the complete setup process: account creation, snippet installation, GA4 configuration, conversion tracking, Consent Mode v2 for GDPR compliance, and debugging. This Google Tag Manager setup guide uses the TRACK Framework throughout to give you a repeatable system regardless of whether this is your first container or your fiftieth.
What Is Google Tag Manager?
Google Tag Manager is the free tag management system at the center of this Google Tag Manager setup guide. It lets you deploy and manage JavaScript tracking tags, including analytics, advertising, and third-party pixels, through a web-based dashboard without requiring direct access to your website's source code.
Before tag managers existed, every tracking script had to be hardcoded into site templates. Adding a new Facebook Pixel meant waiting for a developer. Updating a Google Ads conversion tag meant another deployment cycle. Removing an old script nobody remembered installing meant digging through server files.
GTM removes that dependency entirely. You install one container snippet once, and everything else happens inside the GTM interface.
How GTM Works: Tags, Triggers, and Variables Explained
GTM's architecture rests on three objects. Learn these and the rest follows logically:
When a user visits a page, GTM's container loads and evaluates all configured triggers. When a condition is met (say, the URL contains "/thank-you"), GTM fires the associated tag. Variables supply the dynamic values those tags need, like the conversion amount or the product name.
Key Insight: Tags, triggers, and variables form a single relationship, not three separate concepts to learn in isolation. The trigger decides when, the tag decides what, and variables decide which values.
GTM vs. Direct Code Installation: Why GTM Wins
The case for hardcoding tags directly is usually simplicity: one fewer layer to learn. In practice, that simplicity disappears once you have more than two or three tags, which is exactly why this Google Tag Manager setup guide exists. Everything after that becomes a coordination problem GTM is specifically built to solve.
The TRACK System: A Google Tag Manager Setup Guide Framework
Most Google Tag Manager setup guides give you a list of steps without a mental model. The TRACK Framework is a 5-step system built so your implementation works for a two-tag blog container just as well as a 50-tag enterprise setup.

Follow these in order. The most common GTM mistake is jumping straight to creating tags (Step 3) without planning naming conventions (Step 1) or setting up consent handling (Step 4). Skipping taxonomy up front means spending significant time reorganizing a container that was built without one.
Step 1: Create Your GTM Account and Container
Account vs. Container: What Is the Difference?
Step 1 of this Google Tag Manager setup guide is creating your account and container. A GTM Account is the top-level entity, typically representing your business or organization. A GTM Container sits inside an Account and represents a single website, app, or AMP property. One Account can hold multiple Containers.
For most businesses:
- One Account per company
- One Container per website
- Agency accounts: one Account per client (or a master agency account with client sub-accounts; GTM supports both)
How to Create a GTM Account
- Go to tagmanager.google.com
- Click Create Account
- Enter your Account Name (your company or client name)
- Enter your Container Name (your website domain, e.g.,
www.yoursite.com) - Select Web as the Target Platform (other options: iOS, Android, AMP)
- Click Create and accept the Terms of Service
Choosing the Right Container Type
Step 2: Install the GTM Snippet on Your Website
After creating your container, GTM provides two code snippets. This is where most beginners slow down, but installation is straightforward.
The two snippets:
Snippet 1 (JavaScript, goes in <head>):
<!-- Google Tag Manager --> <script>(function(w,d,s,l,i){w[l]=w[l]||[];w[l].push({'gtm.start': new Date().getTime(),event:'gtm.js'});var f=d.getElementsByTagName(s)[0], j=d.createElement(s),dl=l!='dataLayer'?'&l='+l:'';j.async=true;j.src= 'https://www.googletagmanager.com/gtm.js?id='+i+dl;f.parentNode.insertBefore(j,f); })(window,document,'script','dataLayer','GTM-XXXXXXX');</script> <!-- End Google Tag Manager -->
Snippet 2 (noscript fallback, goes immediately after <body>):
<!-- Google Tag Manager (noscript) --> <noscript><iframe src="https://www.googletagmanager.com/ns.html?id=GTM-XXXXXXX" height="0" width="0" style="display:none;visibility:hidden"></iframe></noscript> <!-- End Google Tag Manager (noscript) -->

Replace GTM-XXXXXXX with your actual Container ID (visible in your GTM dashboard, top right).
How to Install GTM on WordPress
Method 1: Site Kit by Google (Recommended for Beginners)
- In WordPress admin, go to Plugins > Add New
- Search for "Site Kit by Google" and install/activate
- Follow the connection wizard; Site Kit handles both GTM and GA4 code insertion
Method 2: GTM4WP Plugin
- Install and activate the GTM4WP plugin
- Go to Settings > Google Tag Manager
- Paste your Container ID (GTM-XXXXXXX) into the Container ID field
- Set placement to Off for the noscript part if your theme has hook support, otherwise keep default
Method 3: Manual Theme Editing
- Go to Appearance > Theme File Editor
- Open
header.php - Paste Snippet 1 immediately before the closing
</head>tag - Open
footer.phpor find the<body>opening tag - Paste Snippet 2 immediately after the
<body>tag
Warning for WordPress users: If you use a caching plugin (WP Rocket, LiteSpeed Cache, W3 Total Cache), clear your cache after installing GTM. Caching plugins can serve old HTML that does not include the new GTM snippet.
How to Verify Your GTM Installation
Option 1: GTM Preview Mode (covered in detail in the debugging section):
- Open your GTM dashboard
- Click Preview
- Enter your website URL and click Connect
- If a debug panel appears at the bottom of your site, the installation is successful
Option 2: Google Tag Assistant Chrome Extension:
- Install Google Tag Assistant Legacy
- Visit your website
- A green GTM icon confirms a clean installation; yellow means a minor issue; red means a problem
Key Insight: Never skip verification. A misconfigured GTM snippet that loads but fires no tags looks identical to a correct installation until you actually check.
Step 3: Set Up Your GA4 Configuration Tag in GTM
Finding Your GA4 Measurement ID
- Open analytics.google.com
- Click the gear icon (Admin) at the bottom left
- In the Property column, click Data Streams
- Click your web stream
- Your Measurement ID is displayed at the top right:
G-XXXXXXXXXX
Copy it. You need it in the next step. If you haven't created a GA4 property yet, start with [setting up your GA4 property] first.
Configuring the Google Tag for GA4 in GTM
- In your GTM dashboard, click Tags > New
- Click Tag Configuration > Google Tag
- In the Tag ID field, paste your Measurement ID:
G-XXXXXXXXXX - Click Triggering
- Select All Pages (this fires the tag on every page load)
- Name the tag using your naming convention (e.g.,
GT - GA4 - Configuration) - Click Save
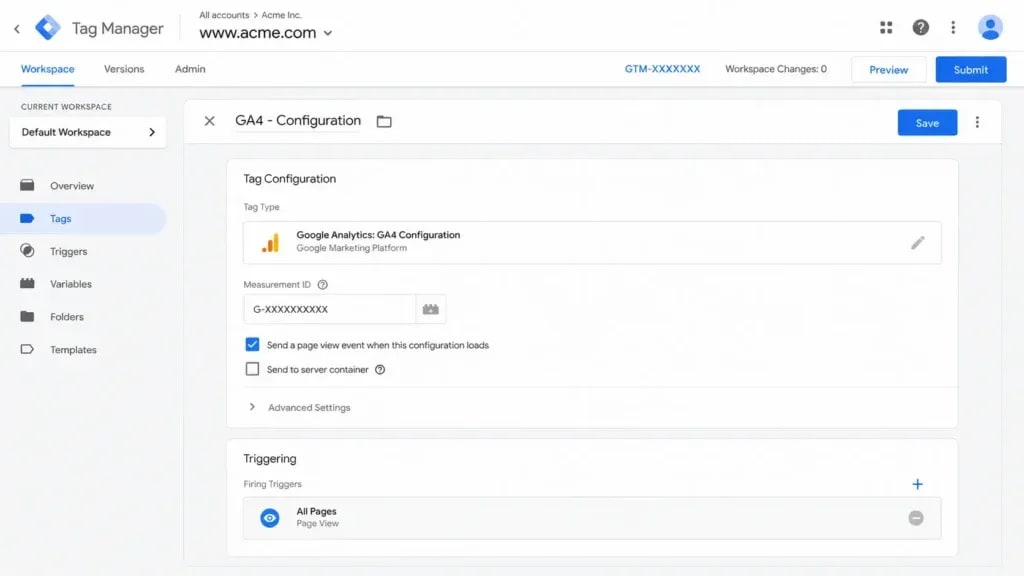
Do not click Publish yet. Validate everything in Preview Mode first (Step K of the TRACK Framework).
Setting Up Enhanced Measurement
GA4's Enhanced Measurement automatically tracks scroll depth, outbound clicks, video plays, site searches, and file downloads. With GTM, Enhanced Measurement is enabled inside GA4 directly, not inside GTM.
- In GA4, go to Admin > Data Streams > Your Stream
- Toggle Enhanced Measurement to On
- Click the settings gear next to it to enable or disable specific event types
When your GA4 Configuration Tag fires via GTM, Enhanced Measurement activates automatically.
Step 4: Configure Event Tracking and Conversion Tags
Setting Up GA4 Event Tags for Custom Actions
GA4 event tags in GTM fire specific events beyond what Enhanced Measurement captures automatically. You need them for custom form submissions, specific button clicks, e-commerce events, and any tracked action that requires custom parameters.
Example: Tracking a Contact Form Submission
- Create a Trigger:
- Create a Tag:
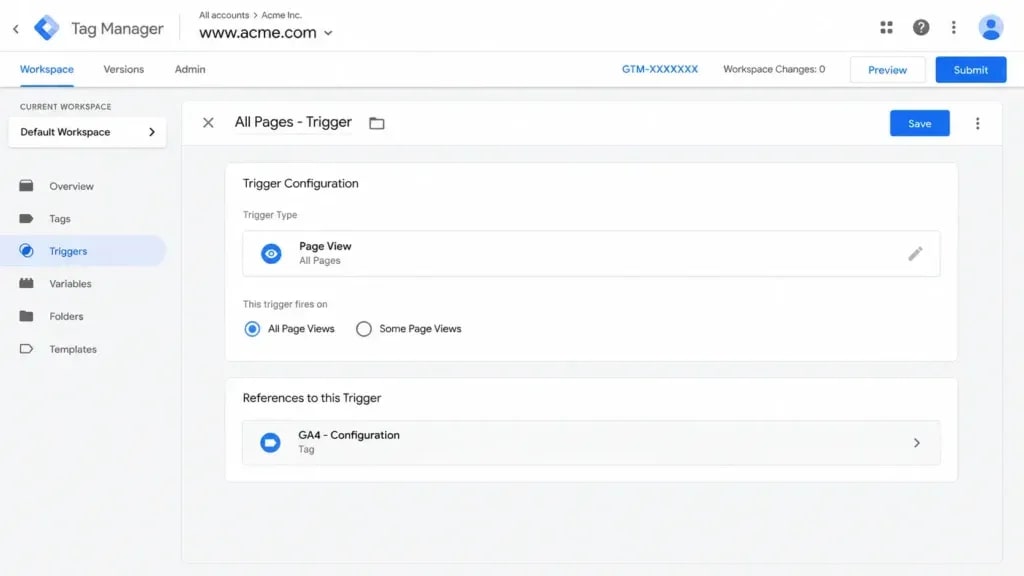
Tracking Button Clicks
- Enable the built-in Click variables (Click Element, Click Classes, Click ID, Click Text, Click URL) in Variables > Configure
- Create a trigger: Click > All Elements
- Add a filter: Click Text equals "Get a Quote" (or whatever your button says)
- Create a GA4 Event tag using that trigger, event name
button_click, and addbutton_textas a parameter
Google Ads Conversion Tracking via GTM
- In Google Ads, go to Tools > Measurement > Conversions
- Create a conversion action (website conversion type)
- Copy your Conversion ID and Conversion Label
- In GTM, create a new tag: Google Ads Conversion Tracking
- Paste the Conversion ID and Conversion Label
- Set the trigger to fire on your confirmation/thank-you page (URL contains
/thank-youor/order-confirmation) - Name:
GAds - Conversion - Contact Form
Key Insight: Always pair a Google Ads conversion tag with a corresponding GA4 event tag for the same action. Two platforms recording the same conversion gives you something to cross-validate against when numbers diverge. For what to do with that data, see [tracking conversions effectively].
Step 5: Implement Consent Mode v2 for GDPR Compliance
Consent Mode v2 is Google's mechanism for controlling how GA4, Google Ads, and other Google tags behave when a user has not given consent. Without it, your tags either fire without consent (a GDPR violation) or fire nothing at all, and you lose that conversion data entirely.
Basic vs. Advanced Consent Mode: Which Do You Need?
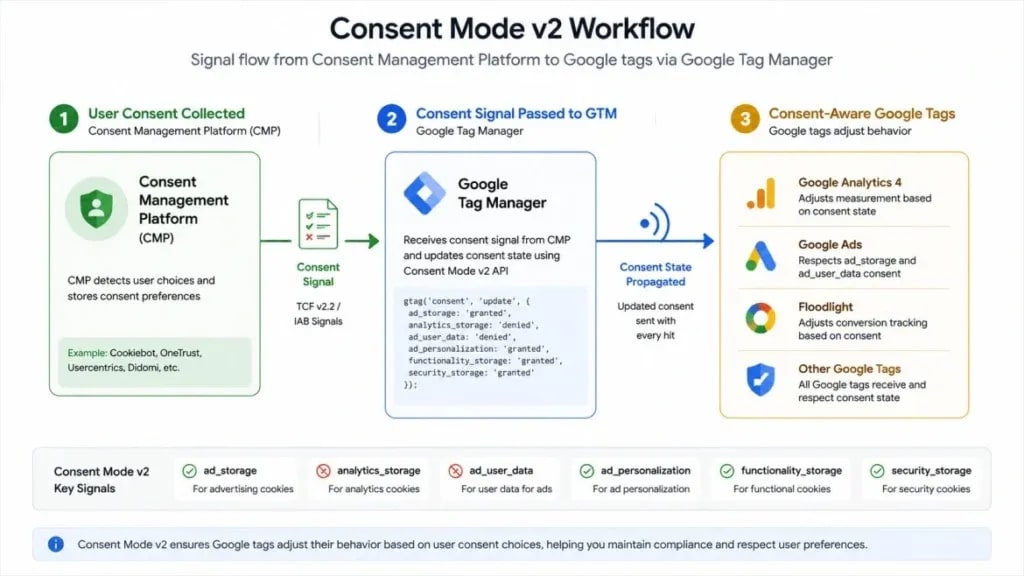
For most businesses running Google Ads, Advanced Consent Mode is the right choice. It preserves Google's ability to model conversions for non-consented users, recovering data that Basic Mode loses entirely.
Connecting a CMP to GTM Consent Mode
Step 1: Choose a compatible CMP CMPs with native GTM Consent Mode v2 integration include: Cookiebot (now Usercentrics), OneTrust, Complianz, CookieYes, and Termly.
Step 2: Configure the CMP to push consent signals Your CMP's documentation will provide a GTM integration method. Most CMPs offer a native GTM template in the Community Template Gallery.
Step 3: Set default consent states in GTM Add a Consent Initialization Trigger tag:
- Tags > New > Consent Overview (use a custom HTML tag if your CMP requires it)
- Set default states:
analytics_storage: denied,ad_storage: denied,ad_user_data: denied,ad_personalization: denied - Trigger: Consent Initialization - All Pages (a built-in trigger type)
Step 4: Configure update commands Your CMP fires gtag('consent', 'update', {...}) when a user accepts or declines. This updates the consent state and allows tags configured with consent checks to fire or remain blocked.
Important: From March 2024, Google requires Consent Mode v2 for any site with EEA users using Google Ads conversion tracking or GA4 audience-based features. This is not optional. See [Google's Consent Mode documentation] for the full technical reference.
GTM Variables: The Engine Behind Smart Tracking
Variables make GTM dynamic. Without them, every tag fires with hardcoded values only. Once you have variables configured, your tags can capture page URLs, user IDs, product prices, form field values, and anything else your website surfaces.
Built-In Variables to Enable Immediately
Go to Variables > Configure and enable:
Navigation Variables:
- Page URL
- Page Hostname
- Page Path
Click Variables:
- Click Element
- Click Classes
- Click ID
- Click Text
- Click URL
Form Variables:
- Form Element
- Form Classes
- Form ID
- Form Target
- Form URL
- Form Text
Scroll Variables:
- Scroll Depth Threshold
- Scroll Depth Units
- Scroll Direction
Enable all of these on day one. They cost nothing and you will need most of them the moment you build anything beyond basic pageview tracking.
The Data Layer: What It Is and How to Use It
The data layer is a JavaScript array that passes structured information from your website into GTM.
window.dataLayer = window.dataLayer || []; dataLayer.push({ 'event': 'form_submission', 'form_name': 'Contact Form', 'form_id': 'contact-main', 'user_type': 'prospect' });
When this code runs on your website (triggered by a form submit, for example), GTM receives the form_submission event and can read form_name, form_id, and user_type as Data Layer Variables.
To read a data layer value in GTM:
- Variables > New > Data Layer Variable
- Data Layer Variable Name:
form_name(exactly as written in the push) - Name:
DLV - Form Name
You can then use {{DLV - Form Name}} in any tag parameter.
Key Insight: Basic GTM implementations track clicks and pageviews fine without the data layer. The moment you need e-commerce tracking, user lifecycle events, or dynamic remarketing, the data layer is what makes those values available to GTM. GTM cannot reliably read them from the DOM alone.
Google Tag Manager Setup Guide: Debugging with Preview Mode and Tag Assistant
Never publish a GTM container version without validating it in Preview Mode first. Publishing blind is how tracking breaks in ways that take days to notice.
How to Use Preview Mode Step by Step
- Click Preview in the top-right of your GTM dashboard
- Enter your website URL (include
https://) - Click Connect
- A new browser tab opens showing your website with a Tag Assistant debug panel at the bottom
- The panel shows:
- Navigate around your site; each page and interaction updates the debug panel in real time
- To test a form submission trigger, submit the form and check whether your tag appears under Tags Fired

Common GTM Issues and How to Fix Them
Using Google Tag Assistant for Validation
After Preview Mode confirms your tags fire correctly, open Tag Assistant:
- Install the Google Tag Assistant Chrome extension
- Visit your website in a normal (non-preview) browser tab after publishing
- The extension shows a summary of detected Google tags
- Green status = healthy; Yellow = warnings (review them); Red = errors requiring fixes
GTM Best Practices and Common Mistakes
Naming Conventions That Scale
Consistent naming is one of the most overlooked parts of any Google Tag Manager setup guide, but it is the difference between a container one person can maintain and one a team can maintain. Use a structured prefix system:
Tags: [Platform] - [Action/Type] - [Description]
GA4 Event - Form Submit - ContactGAds - Conversion - PurchaseMeta Pixel - PageView - All Pages
Triggers: Trigger - [Type] - [Description]
Trigger - Page View - All PagesTrigger - Click - CTA ButtonTrigger - Form Submit - Contact
Variables: [Type] - [Description]
DLV - Transaction ID(Data Layer Variable)CJS - User ID(Custom JavaScript Variable)LT - Campaign Source(Lookup Table)
Key Insight: Setting up a naming convention at the start takes 10 minutes. Fixing a container with 40 inconsistently named tags takes hours and usually requires opening every tag to understand what it does.
Version Control and Workspaces
GTM creates a numbered version every time you publish. Version 1 is your first publish; Version 15 might be your GA4 event expansion three months later.
Best practices for versioning:
- Always name your version when publishing: "Added GA4 e-commerce tracking" is more useful than "Version 8"
- Use Notes in the version panel to document what changed and why
- Use Workspaces to stage changes: the Default Workspace is fine for solo work, but teams should create named workspaces (e.g., "GA4 Events Q1 Expansion") to isolate work in progress
Seven GTM Mistakes That Break Your Tracking
- Publishing without Preview Mode validation: the single most common cause of broken tracking
- Skipping the noscript snippet: some users run browsers with JavaScript disabled, and the noscript fallback serves them
- Using All Clicks or All Forms triggers without conditions: this fires tags on every click or form on the page and inflates your event counts
- Leaving the hardcoded GA4 snippet on the page after adding GTM: this creates duplicate pageview events
- Forgetting to enable built-in variables: you will spend 30 minutes wondering why
{{Click Text}}returns undefined - Not naming versions: two weeks later you cannot tell which version broke your conversion tracking
- Skipping Consent Mode v2: this creates GDPR compliance exposure and breaks Google's conversion modeling for EU traffic
Advanced GTM: Server-Side Tagging (When You Are Ready)
What Is Server-Side GTM and When Should You Use It?
Standard GTM runs entirely in the user's browser. Every tag, pixel, and tracking script loads in the visitor's browser session, which means ad blockers can stop them and browser privacy features can restrict third-party cookies.
Server-side GTM moves that tagging logic to a server you control. When a user visits your site, events go to your tagging server first (hosted on Google Cloud, AWS, or similar), which then forwards the data to GA4, Google Ads, Meta, and other platforms. Because the requests originate from your server, they bypass most ad blockers and use first-party cookies.
Consider server-side GTM when:
- A significant share of your traffic comes from Safari (ITP) or Firefox (ETP)
- Ad blocker rates above 15% are affecting your conversion data accuracy
- You need first-party cookie tracking for accurate attribution
- Your consent mode modeling is showing large data gaps
You probably do not need it yet if:
- You are just getting started with tracking
- Your data gaps are small
- Your team has no technical resource to manage a tagging server
Server-side GTM is a meaningful step up in both complexity and cost. Get your client-side implementation solid first. Everything in this Google Tag Manager setup guide covers that foundation.
This Google Tag Manager setup guide covers the rollback process in the debugging section above.
Frequently Asked Questions
Is Google Tag Manager free to use?
Yes. GTM is completely free for standard client-side web implementations. Server-side GTM requires a hosted tagging server, which typically runs $10 to $50 per month for small sites on Google Cloud, but the GTM platform itself has no license fee.
Do I need Google Tag Manager to use GA4?
No. You can hardcode GA4's Google tag (gtag.js) directly in your site's HTML. But GTM makes ongoing management considerably easier: adding events, updating tags, and configuring consent all happen in the GTM dashboard without touching code.
What is the difference between Google Tag Manager and Google Analytics?
GA4 is the analytics platform that collects and reports on your website behavior data. GTM is the delivery mechanism that puts GA4 (and other tracking scripts) on your website. GTM doesn't collect analytics data on its own.
How long does GTM setup take?
A basic setup, covering account creation, snippet installation, GA4 configuration tag, and Preview Mode validation, takes 30 to 60 minutes for a straightforward website. Adding conversion tracking, event tags, and Consent Mode v2 adds another 60 to 90 minutes. Bookmark this Google Tag Manager setup guide to return to specific sections as your tracking needs grow.
Can GTM slow down my website?
GTM loads asynchronously, so it does not block page rendering. That said, every tag you add executes in the browser and contributes to page weight. Keeping your tag count reasonable, removing unused tags, and avoiding synchronous custom HTML tags will minimize the performance impact.
What happens if I accidentally break something in GTM?
GTM's version control saves every published version. If a change breaks your tracking, go to Admin > Container Versions and click Publish on the last known good version. The rollback is immediate.
Sources and References

Written by
Bibek Thapa
AI-Powered Digital Growth Strategist
Bibek Thapa works across AI workflows, SEO, AI search optimization, content strategy, website growth, and productivity systems. Anobee documents practical lessons, tools, experiments, and systems for improving digital presence.
- AI workflows
- Digital growth
- SEO
- GEO
- AEO
- Content strategy
- Website growth


